
Today, we will talk about email marketing on a simpler level for your proper understanding, not on a high scale confusing level as always with so many bloggers and internet marketers who go about making things difficult for people.
Anyways, that is by the way then, let’s start.
Remember, this is going to be according to my own experiences starting from 2009 as a Pro-blogger. Email marketing is the process of accumulating emails of loyal subscribers to your platform, finding a way to maintain and keep in touch with them in order to sell your products or services to them as time goes on.
There is one major adage we internet savvy people use and that is, email subscribers are your bank account. And what this means is that, they are just the one to put money inside your bank account when the time is due.
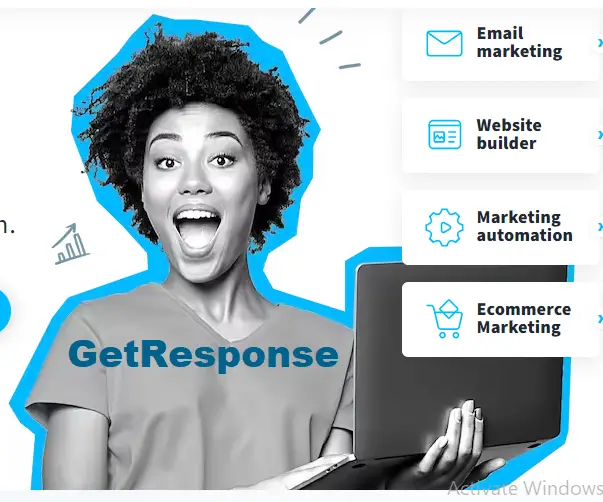
GetResponse allow businesses to create and send email campaigns, manage subscribers, and automate marketing workflows. It offers a wide range of features including email design templates, landing pages, webinars, and marketing automation. GetResponse email editor is user-friendly and allows you to create professional-looking emails with ease.
Grow your business with customer experience automation
The email marketing, marketing automation, and CRM tools you need to create incredible customer experiences.
And there are five processes you can follow to engage on these email marketing. And they are:
— MEANS OF ACCUMULATING THE EMAILS (LEAD GENERATION)
— SUSTAINING THE EMAIL (NEWSLETTERS)
— TOOLS TO USE (AUTORESPONDERS)
— SELL PRODUCTS OR SERVICES TO EMAIL SUBSCRIBERS
— SELL YOUR ENTIRE EMAIL FOR HUGE AMOUNT OF MONEY
Let’s talk about them one after the other for proper understanding.
MEANS OF ACCUMULATING THE EMAILS (LEAD GENERATION)
To generate leads means to accumulate those emails from loyal customers. There are many ways to do that in which one of them is by opt-in form.
Another process is by random collection of those emails through your comment section and uploading them to your subscription platform (ONE BIG PROBLEM WITH THIS IS THAT, PEOPLE MAY GO ABOUT SUBMITTING WRONG EMAIL TO YOUR SUBSCRIPTION).
The best way to accumulate emails as leads is by the use of pop-up forms on your blogs or websites (IN THIS ASPECT, YOU HAVE TO ENABLE DOUBLE OPT-IN OPTION TO ALLOW THEM VERIFY THEIR EMAILS BEFORE BEING ADDED TO YOUR EMAIL LIST) We will practically elaborate more on this in this tutorial.
Another means is to embed the email collection form field within your content so that readers could be engaged while reading your blog posts or contents.
SUSTAINING THE EMAIL (USING NEWSLETTER)
Let’s assume you have setup your platform and is bussy accumulating leads. You have to remember that accumulating leads is not the final process.
You must find a way to maintain and keep those subscribers up and doing or else, you will loose a whole lot of them by unsubscriptions.
Then, how can you maintain and keep those email subscribers within your subscription platforms?
You have to make use of what is called NEWSLETTER. Newsletter is a process of sending weekly contents or blog posts related to your area of specialization which will be beneficial to your lists of subscribers.
These Newsletter could be automated or manually sent to those subscribers of yours through some software applications we will discuse here latter.
With this process, your lists of subscribers could be sustained and cordial relationship will be guaranteed.
TOOLS TO USE (AUTORESPONDERS)
There are a whole lot of tools you can use to achieve this process. And i’m going to work you down to the one i do make use of, and its benefiting me since I started using it.
When i started selling information products online as of early 2009. I started of with Getresponse, then switched to Aweber as software i do use to send automated Email Newsletter to my lists of subscribers.
Today, we are going to talk about the number one email marketing software almost 65% of the internet marketers uses. And that is, Mailchimp. (Marketing smart for big ideas) Mailchimp is a tool that helps small businesses to do big things, with the right tools and guidiance every step of the way.
So let’s start. Below image is the screenshot of the homepage of mailchimp. To start you have to register or if you already have an account you have to log in.
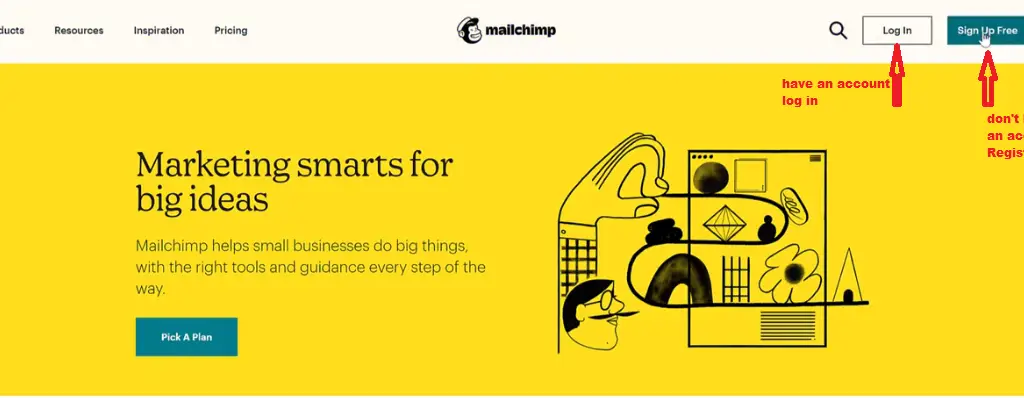
STEP-1: CLICK ON THE BUTTON “Sign Up Free” and you will be redirected to a page that looks like the image below.
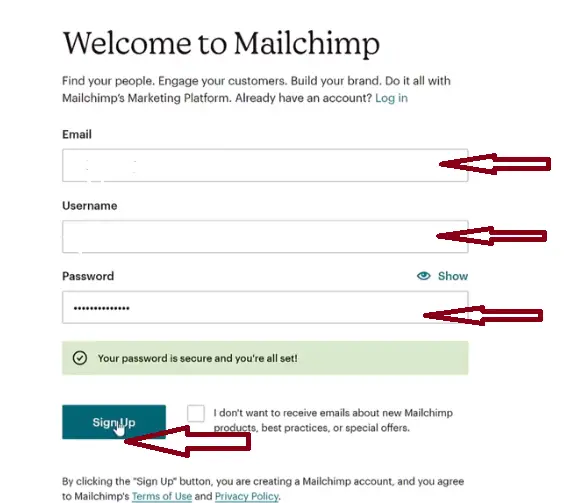
Enter your “email, Username, and password” hit the Sign Up button to get registered. Image description below.
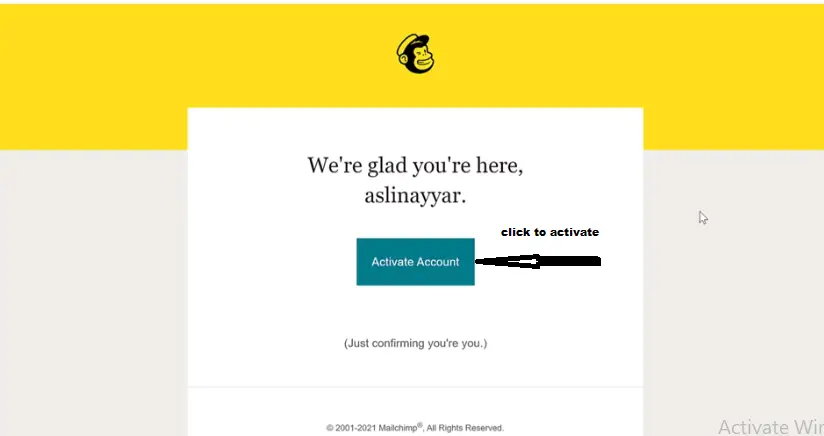
You will be redirected to a page that will require you to verify your email. Go to your email and get verified. Image description below.
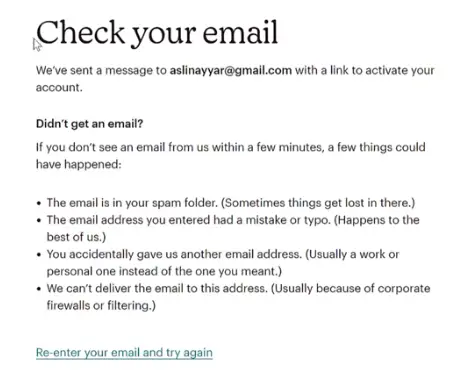
Click the button below the image as indicated in your email to get verified.
A page like below will ask you to verify if you are a robot or not. Clikc on it to verify. Image description below.

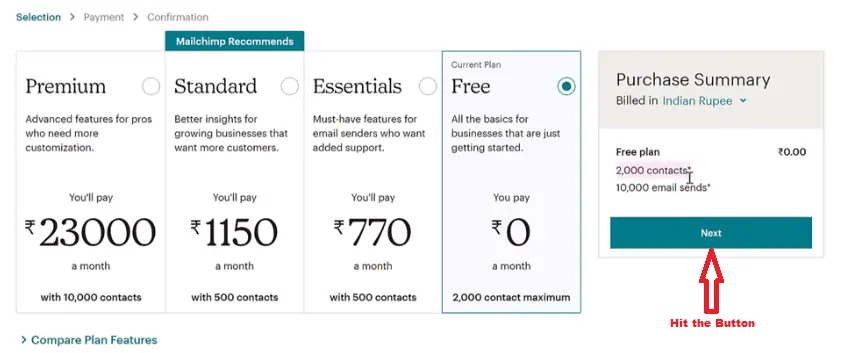
Then you will be redirected to a page where you will have the options to select plans. Ofcourse we will be going with the FREE plan. Before, when i started out, the FREE plan will allow you to have an email list subscribers of 2000 maximum and you can send ten thousand emails as i guess.
But not until January 2023 when mailchimp made some changes and reduced the number to 500 subscribers limit for FREE plans. Anyways, that still looks good for email marketing giant like Mailchimp.
BLOGTOSTAY TIPS:– Take note, some changes may occur on the interface of mailchimp as you follow my directives as of the time of organizing this tutorial but, all features still remain the same when you become more observant while scaling through.
Select the FREE plan and hit the NEXT button, as indicated by the image below.
Enter your basic information according to the image description below. Remember, website URL and phone number are optional because, you can still do internet marketing without having a website.
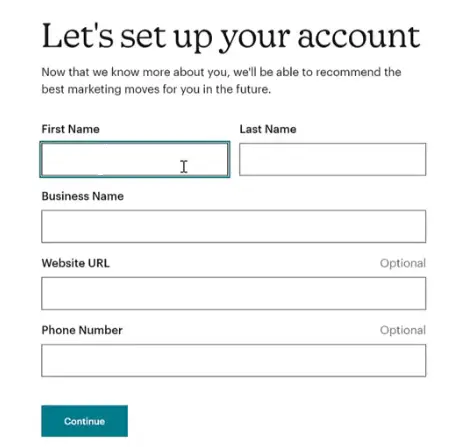
Click on CONTINUE and you will be redirected on where to enter your basic address. Image description below.

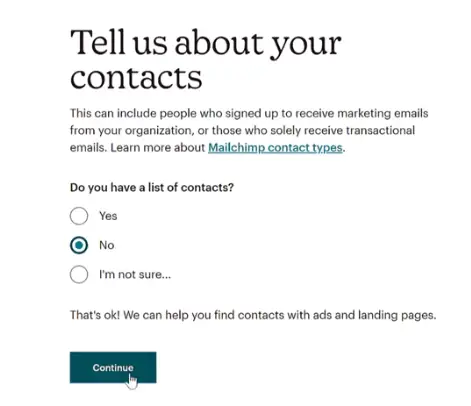
Click on continue to get to the next page where you will be required to import your contacts if any. Select NO indicating you do not have any subscriber because, we are doing everything from scratch. And hit the CONTINUE button. Image description below.
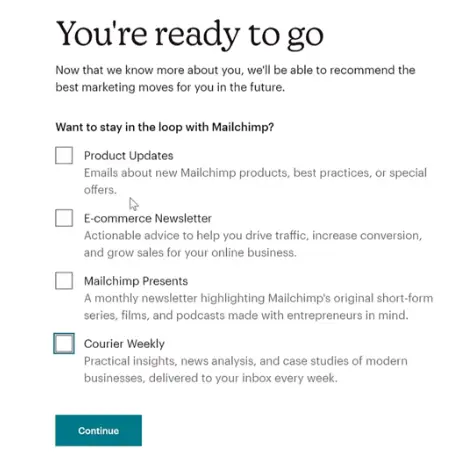
You will be embraced with Survey forms which i will advice you to skip all of them and continue. Then, the page where by you will be asked if you want to recieve any newsletter from mailchimp. I do not want to recieve any and i will untick them and click CONTINUE button. Image description below.
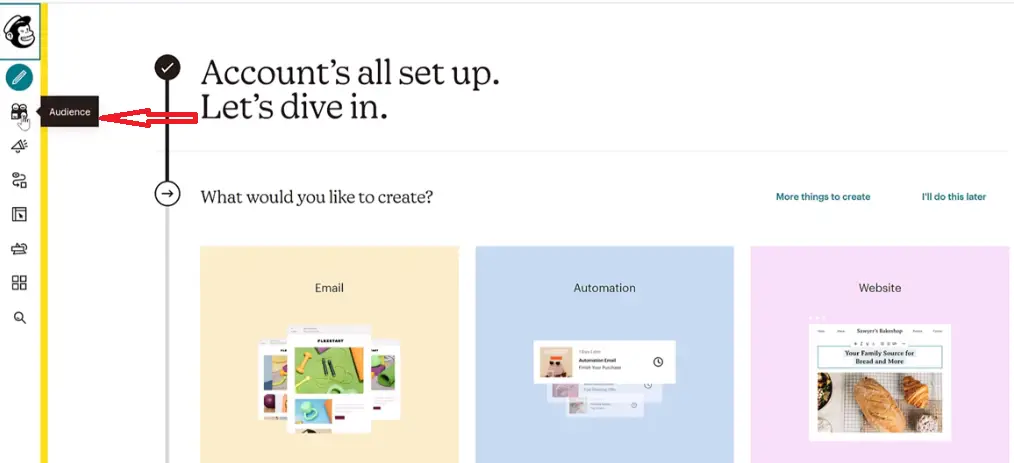
And now your account is finally created as indicated by the image below.

They have given you a process but we would not follow this process, we are going to start afresh to enable us understand well what we are about to do.
According to the image above, they will ask you what you would like to create either, Email, Automation or website. Below, there are options for you to ADD YOUR ACCOUNTS or LAUNCH CAMPAIGN.
To start now we will go ahead and create our AUDIENCE.
HOW TO CREATE AUDIENCE LIST IN MAILCHIMP
Go ahead and click the AUDIENCE settings by the left side of the menu bar. Image description below.
You will be embraced with the page below which indicates that “This audience has 0 contacts. And 0 of them are subscribers.” Image description below.

There are changes on mailchimp just like i told you before. Earlier on time you could create new audience but now you cannot create audience again. Rather, an AUDIENCE is automatically created for you. To see this audience click on MANAGE AUDIENCE then on the drop-down that comes up select VIEW AUDIENCE. Image description below.
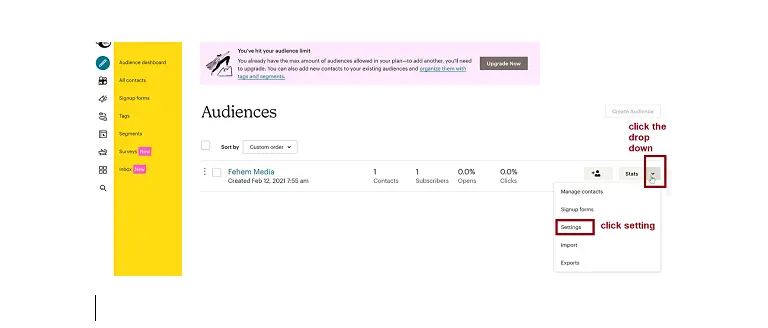
As you can see, one list is already created for you as indicated by the image above with the name FEHEM MEDIA (this should be the name you filled while registering with mailchimp.) Then, to manage this audience’s settings, you have to click the drop down arrow as indicated by the image above.
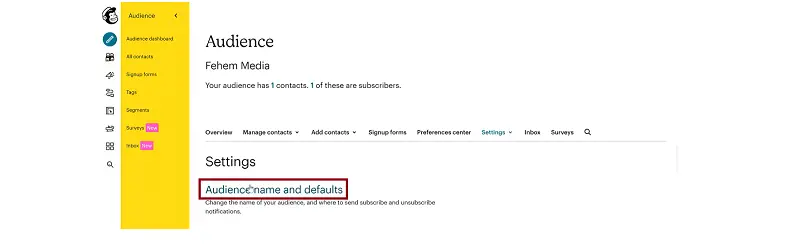
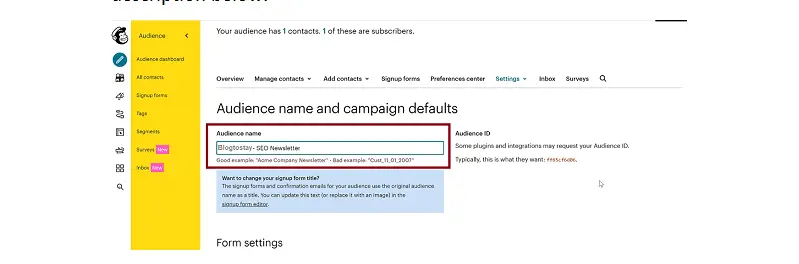
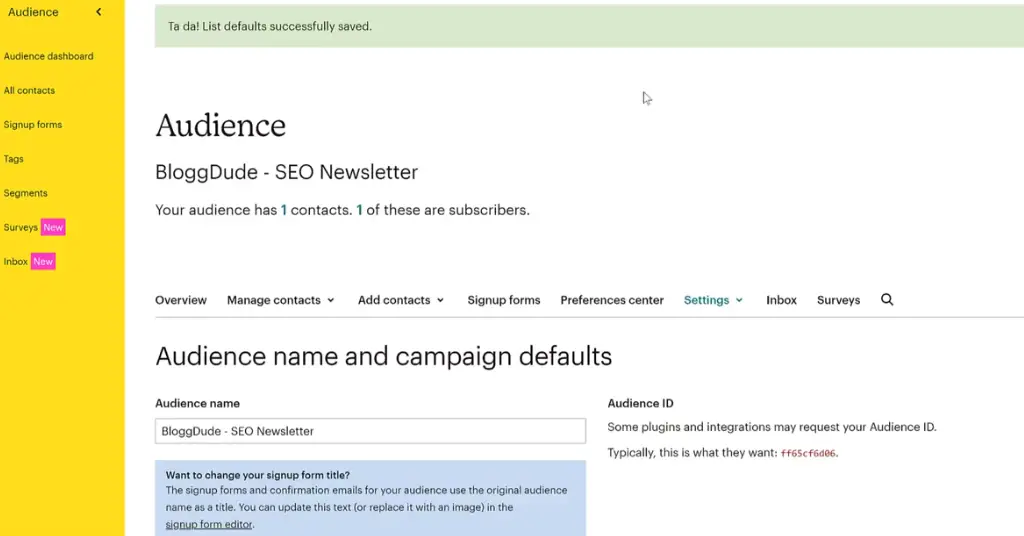
In this setting there are so many options if you scroll down the site. But you have to select AUDIENCE NAME AND DEFAULT to start with. Image description below.
You will be redirected to a page that looks like this below. Now, you have to be very careful while filling your AUDIENCE NAME. For example. I will fill in something like this; (Blogtostay . SEO Newsletter) Because, i’m targeting SEO contents. Remember, this is the first thing your subscribers will see on their newsletter. Image description below.
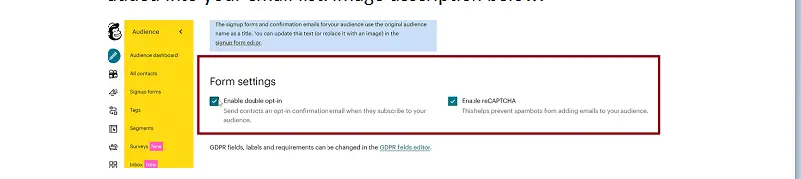
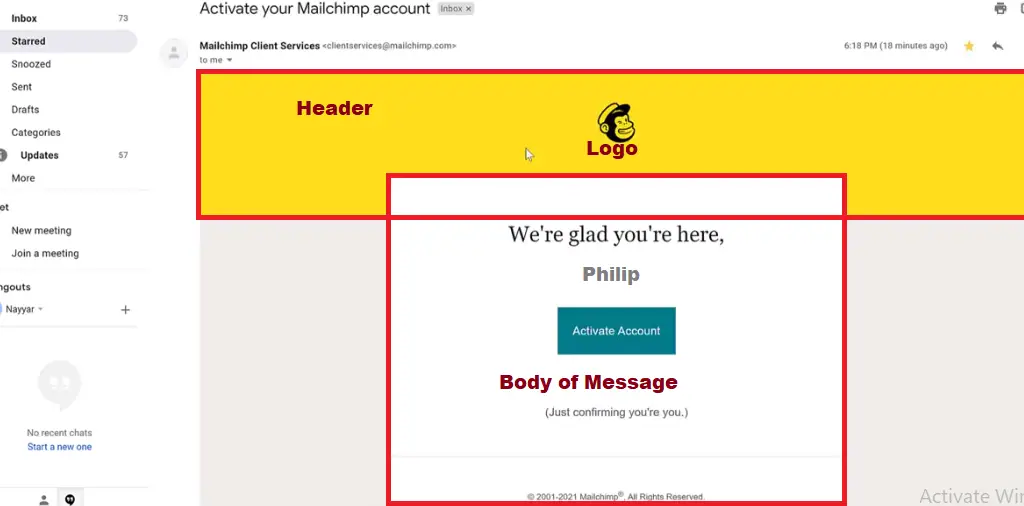
You can enable double opt-in, and this will help you restrict people from filling your subscription lists with spamy emails(JUST LIKE I INDICATED THAT WE WILL LATTER SEE THE PRACTICALITY IN THIS TUTORIAL). In this process they will be sent a message directly to their email and be asked to confirm that registration before being added into your email list. Image description below.
Then the image description of how the email sent to you to confirm will look like the image below.

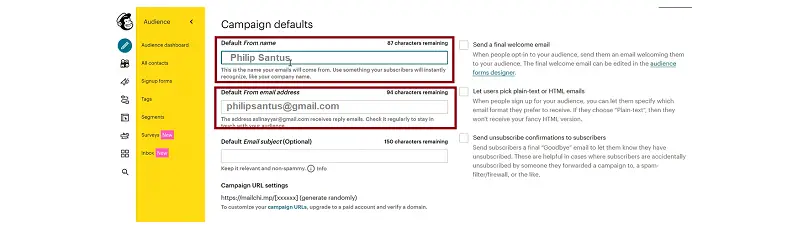
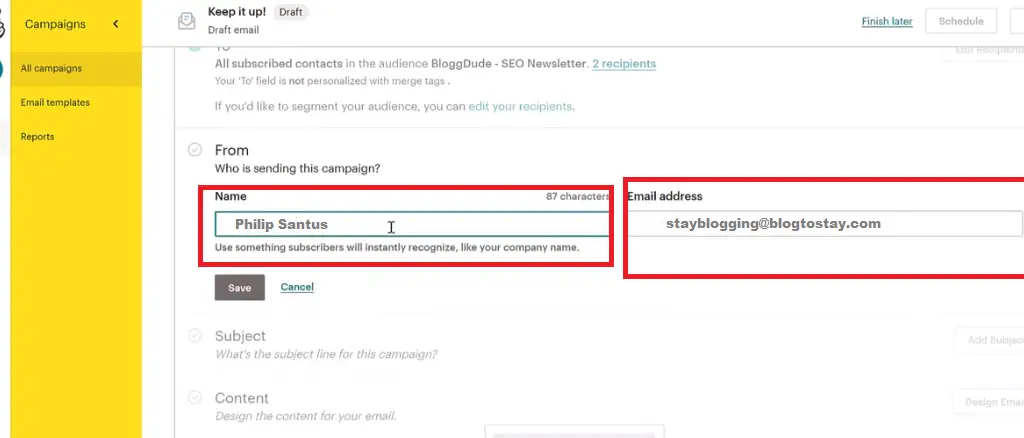
Very important here now, you have to enter the Default from name, Default from email. These are what will appear as the person sending the email whenever someone recieves your email messages.
BLOGTOSTAY TIPS:– I advice you to open a business email account and use it as your DEFAULT FROM EMAIL ADDRESS. The reason being that, your email will definitely end-up on the spam box if you use the normal Gmail account or any email account apart from business email. Take note of that.
Image description below.
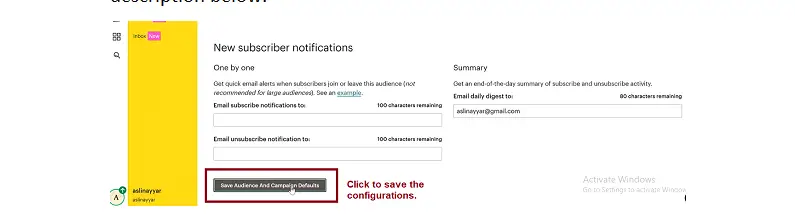
Click on save audience to save the configurations. Image description below.
Then you will be embraced with the below image as having finally created your AUDIENCE LIST. Image description below.
HOW TO CREATE NEWSLETTER EMAIL TEMPLATE
Example of a template is the image description below.
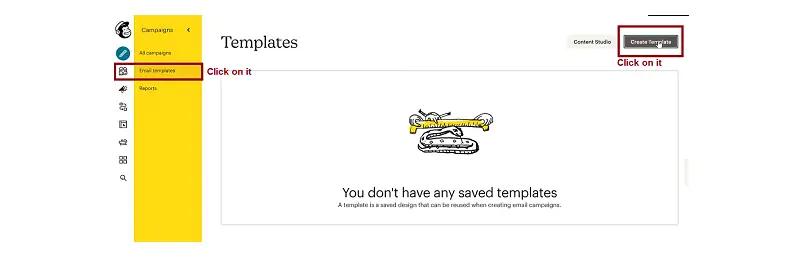
You can create a template and automate it so that every week your message will be sent automatically at a framed timeline without sending the message manually. That will make your job very easy.Now, to create a new template, go to CAMPAIGN at the top-left-hand corner icon and click on it. Image description below.

It will take you to a page requesting for you to run a campaign. And we are not running any campaign right now, we just want to create a new campaign. Then, click on EMAIL TEMPLATES and click on CREATE TEMPLATE. Image description below.
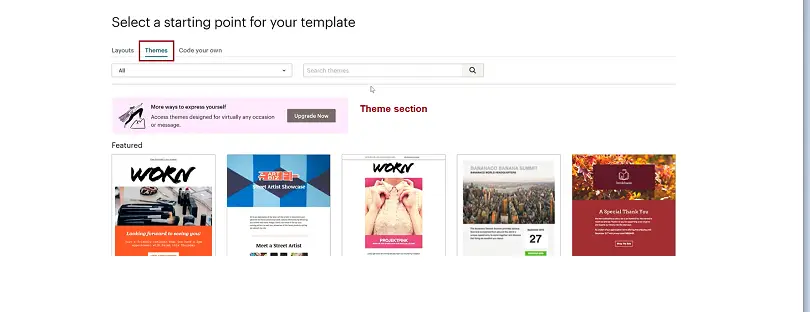
You will be redirected to this page where you have three different options. Which are: Layouts, Themes and Code Your Own. Image description below.
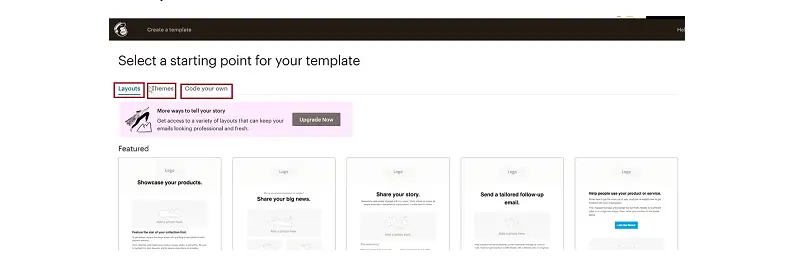
The above image is the layout section which you can use to create your own template.
The Theme section according to the image description below. You can simply click on any of the theme to import and customize it. Very easy to do if you want to make use of theme.
Then the CODE YOUR OWN section according to the image description below. You can import your own HTML code to design your own template if you want. But, i advice you use LAYOUTS which i will definitely show you how to do that easily.

We will use the LAYOUT SECTION. Now get down to BASIC for most of these options are paid plans. Click on the first option of the BASICS. Image description below.

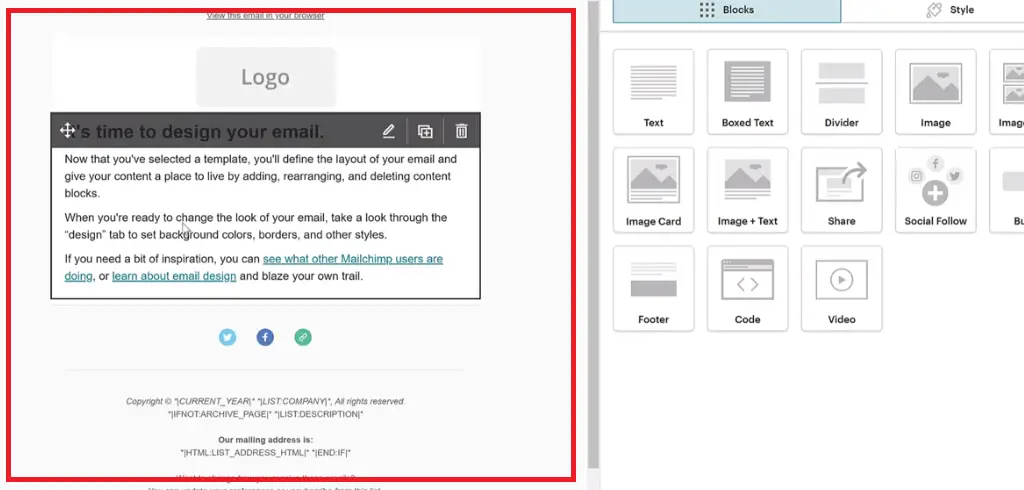
The imported TEMPLATE will look like the image below. The newly imported template sample.
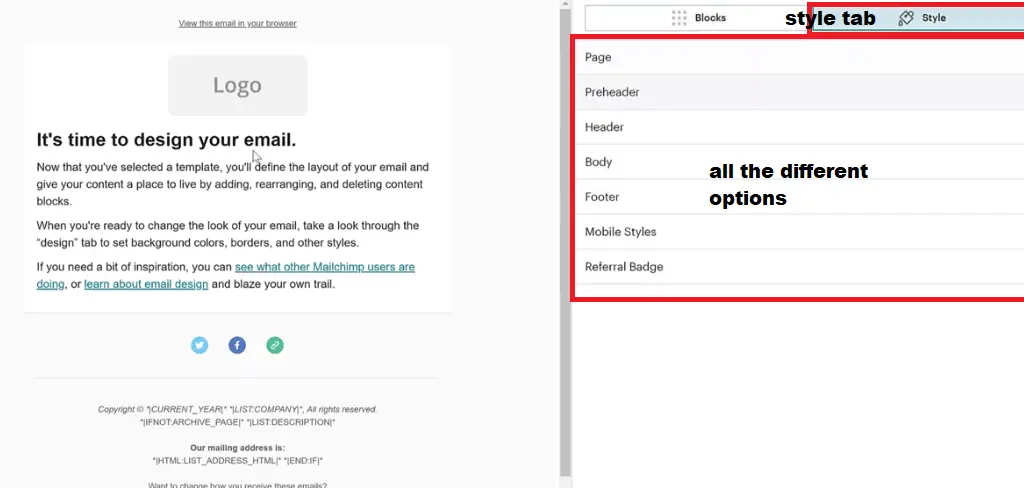
To change the background color, click on the STYLE option at the extreme right-hand-side corner.
You will see all the different options. Image description below.
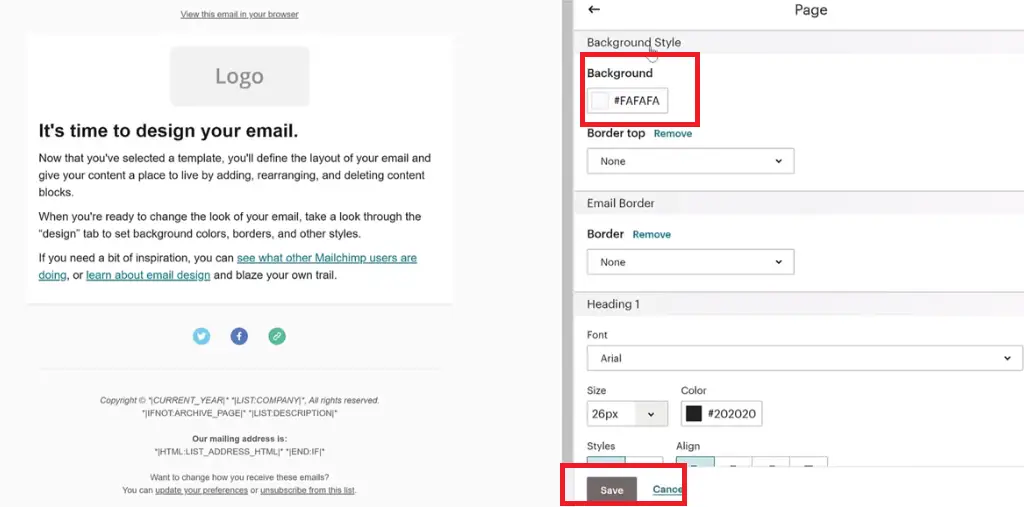
Then to change the color of the background, select the PAGE element among the options. Go ahead and change the background color and hit the SAVE button to save the changes. You can as well do other changes such as border, font-size and all other features. Image description below.
FOR THE HEADER:
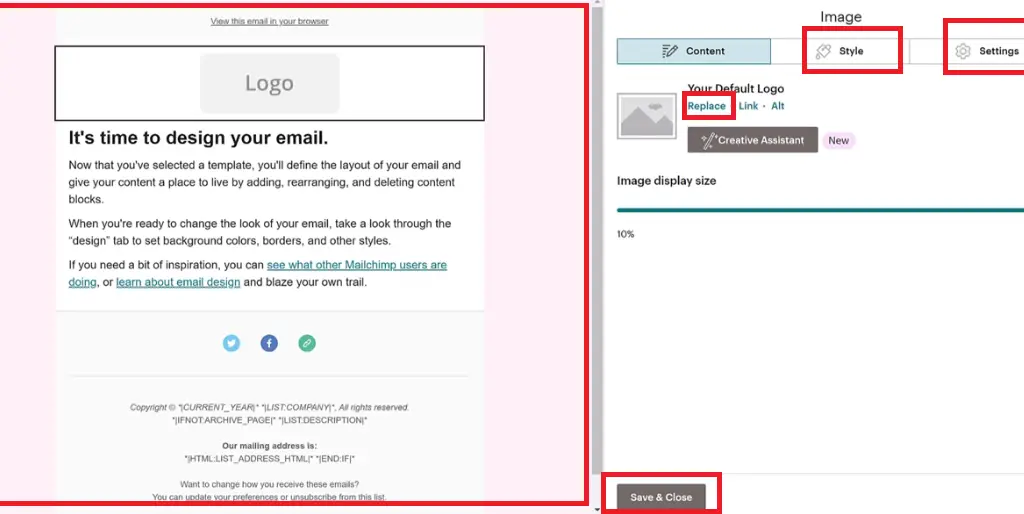
To upload your logo, click on the LOGO section on the left side within the created template. The settings will appear on the right hand side.
Click on REPLACE to chose the logo from your computer folder. After that you can go ahead and customize the logo with the options such as; STYLES or SETTINGS. After that, hit SAVE & CLOSE button to save the changes made. Image description below.
FOR THE CONTENT:
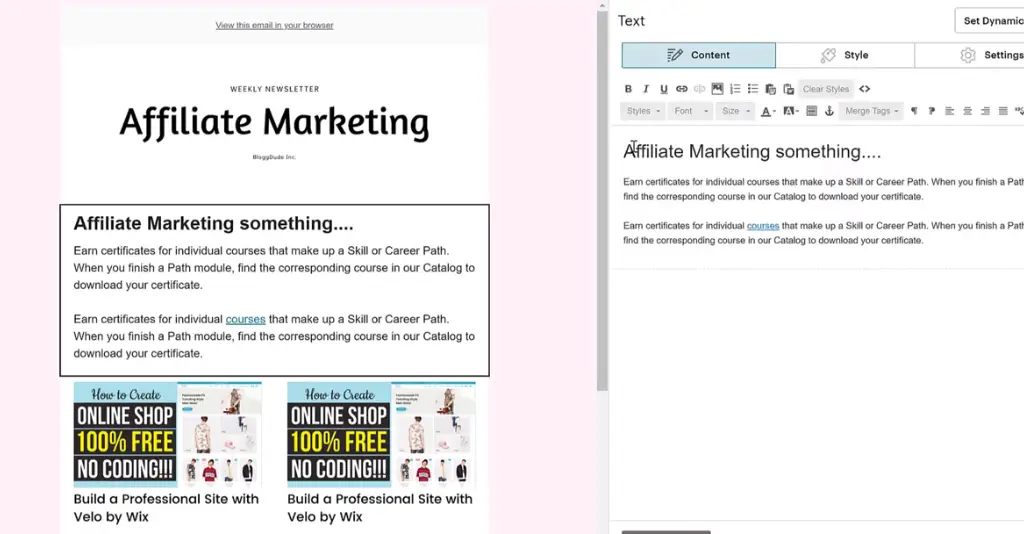
Click on the BODY within the template. Then click on BLOCKS option by the top right hand side and you will be embraced with the next page where you can enter your desired text. Image description below.

You can change the styles of the text like the font size and so on. Replace the text with your newsletter of choice and hit SAVE & CLOSE button to save your changes.
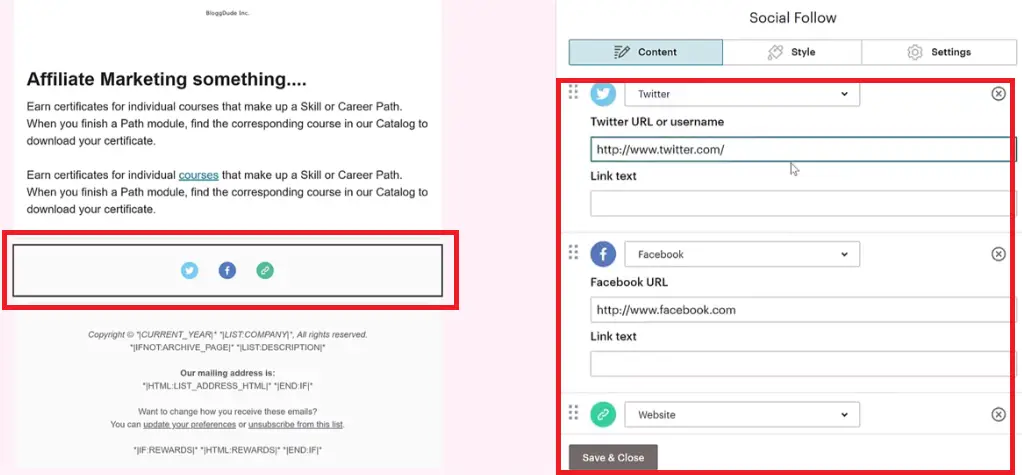
TO CHANGE THE SOCIAL SHARE ICONS:
Click on the social share on the already created template and change the settings as well. Enter all your social media links on the URL as indicated by the image below and do other settings, do not forget to save the changes made. Image description below.
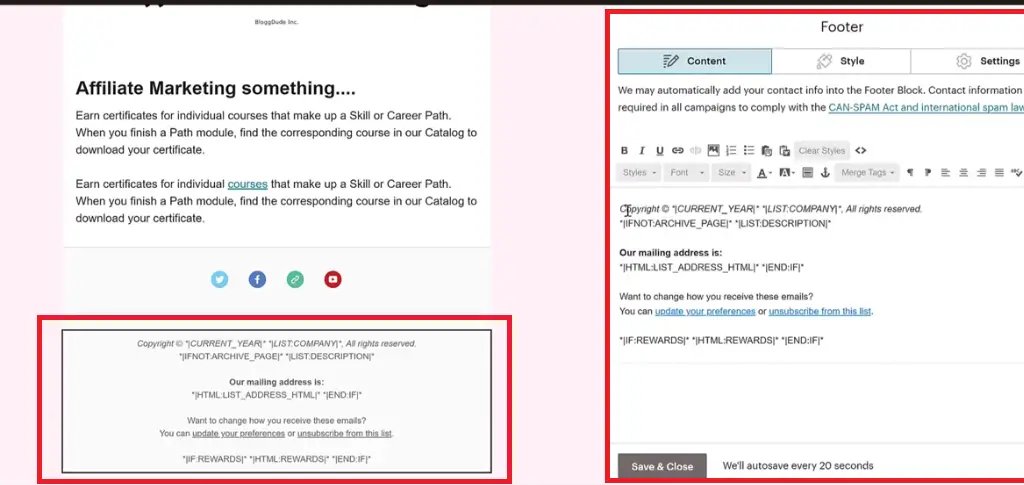
To complete your design, go ahead and click on the footer, do the same changes. This is how your footer will look like according to the image description below.
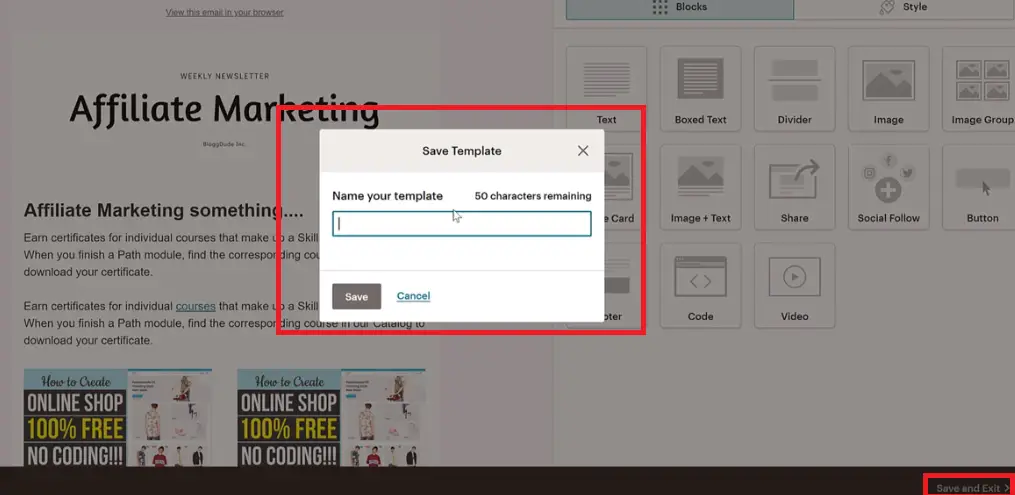
After customizing the template, if you want to see the preview you can press 1 (one) on your keyboard.
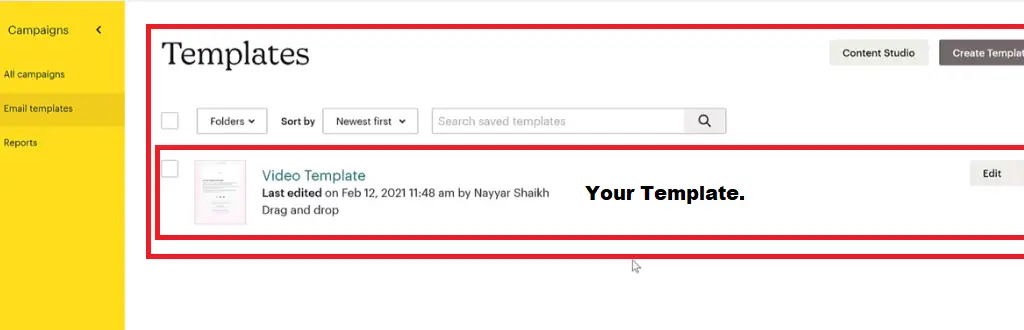
Once you are satisfied with the design, click on SAVE & EXIT button. A pop-up form will appear enabling you to name your project. Give it any name and hit SAVE button. Image description below.
Your template will be saved and be ready to be re-used whenever you want to use the same template. Image description below.
HOW TO INTEGRATE ANY WEBSITE WITH MAILCHIMP
To do that, enter into the dashboard of your website with the URL through your browser. (e.g https://example.com/wp-admin) that should be your URL to your wordpress dashboard.
After that, click on PLUGINS by the left hand side menu and click ADD NEW on the top to add new plugin. Image description below.
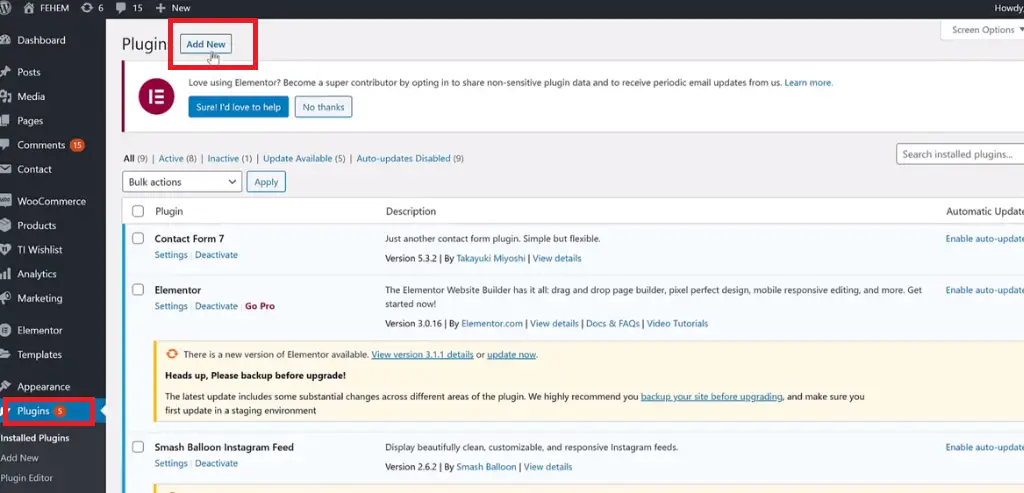
At the search field on the right hand side type in mailchimp. Two plugins will appear; MC4WP: mailchimp for wordpress and Mailchimp for Woocommerce. The former is for everybody, whether creating blogs or any type of website, while the latter is for eCommerce websites only.
We will be installing the two. Go ahead and hit the INSTALL button and as well ACTIVATE the plugins after installations. image description below.

Once it is activated now it’s time to link your website with mailchimp.
To do so, move your cursor to the left-hand-side bottom of the menu and locate MC4WP (meaning, mailchimp for wordpress), click on it and you will be embraced with a page like the image below.
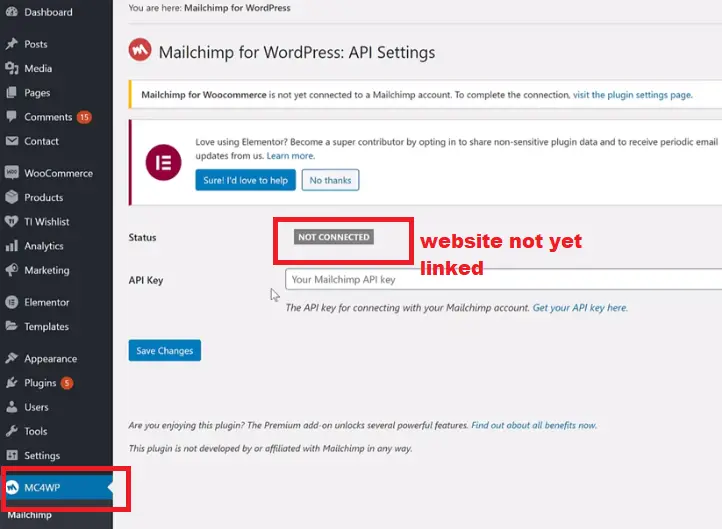
To link your website with mailchimp, you have to enter your API key. Now, let’s see where we can get our API Key.
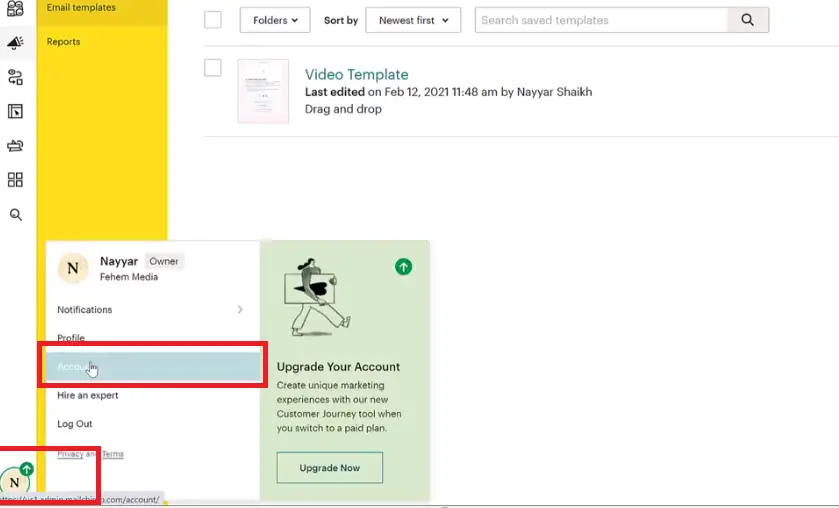
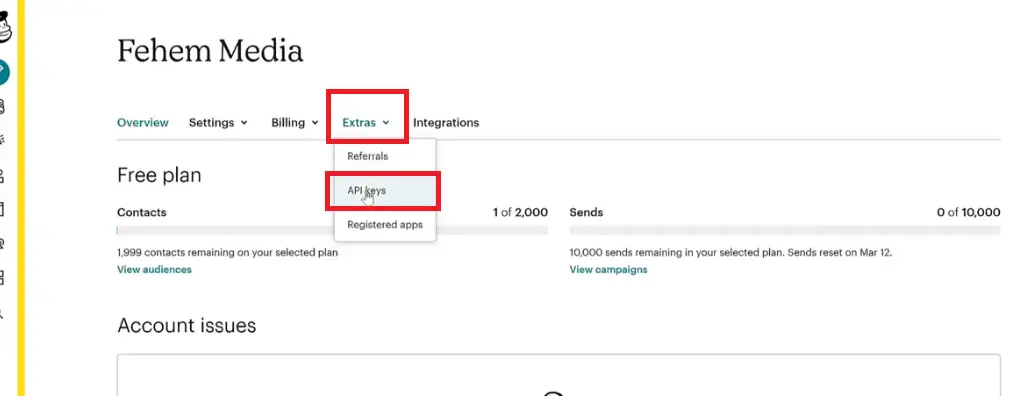
Go to mailchimp.com, log into your account, within the dashboard locate your account profile at the extreme bottom left-hand-side and click on it, locate ACCOUNT and click as well. Image description below.
Select Extras on the next page and click on API keys. Image description below.
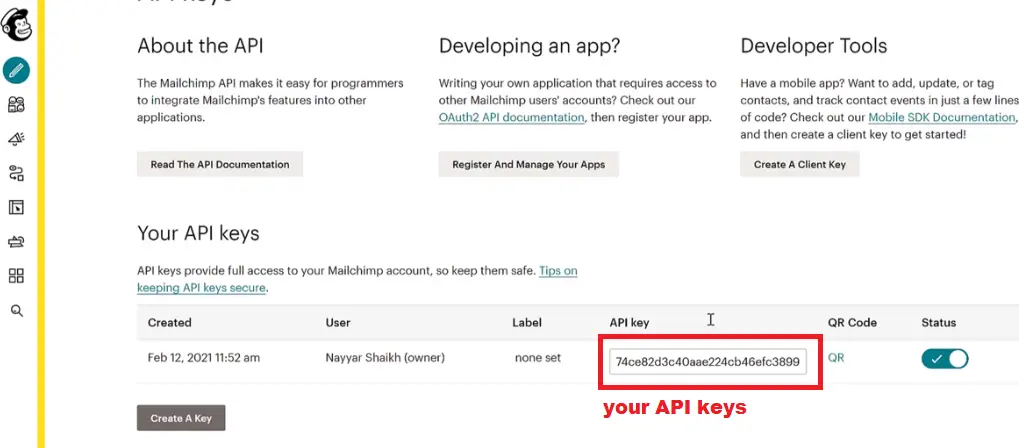
Before now on the next page, API keys will be generated for you automatically but now, it is not so again. You go ahead and hit CREATE A KEY button to generate your own API keys.
A key will be created for you instantly, copy that key. Image descritpion below.
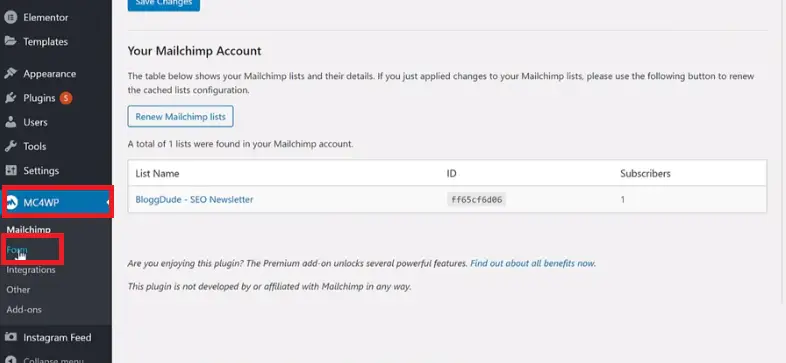
Go back to you website wordpress dashboard and past the keys on the API keys form and hit SAVE CHANGES to save as usual, and will be connected and once it is connected it will display the NOT CONNECTED sign as CONNECTED with greeen color as an indication. Image description below.

Remember, in the beginning we created this audience which is showing up as your website name according to the image above. You will also get your ID and you will be as well counted as one subscriber.
CREATING A FORM USING THIS PLUGIN MC4WP
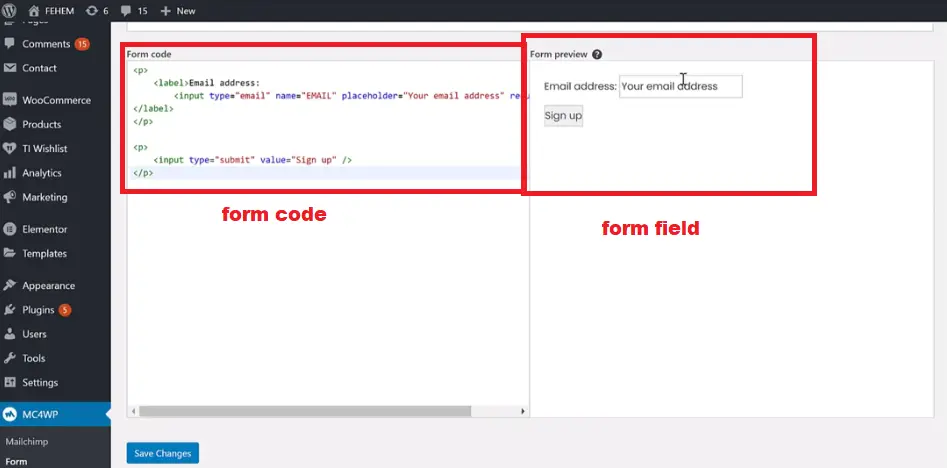
An empty form field will appear fo you to name your form bearing, “what is the name of your form?” add your form’s name which could be anything and click on ADD NEW FORM button.
Your form will be created and look like the form on the image below.
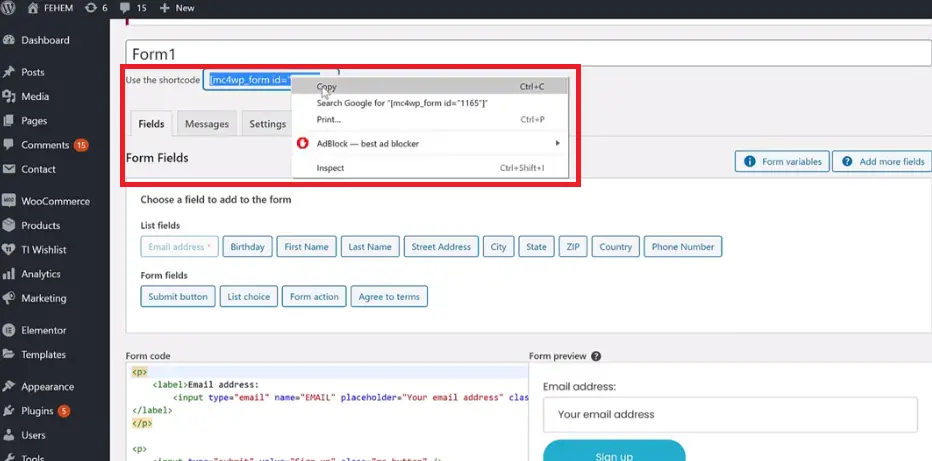
Once you have created this form you can use it any where in your website. To do so, just copy the short code at the top option that indicates “Use the shortcode.” Image description below.
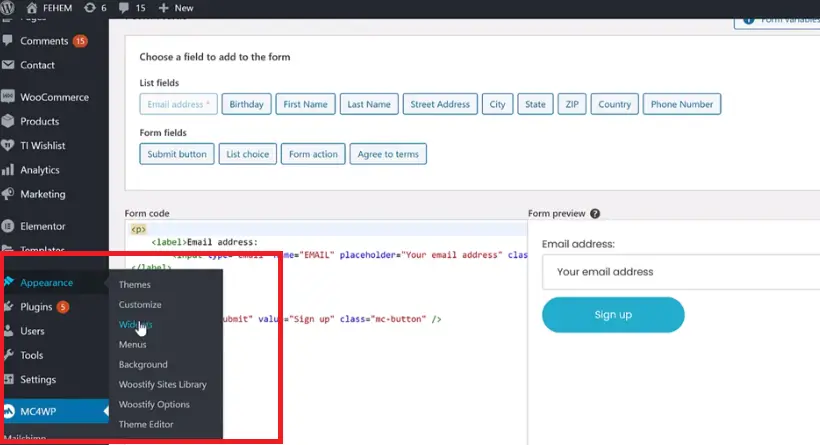
For example, to use this code on my side bar, go to APPEARANCE at the left-side menu bar, locate WIDGETS. Image description below.
Select the “MAILCHIMP SIGN UP FORM” option. Image description below.
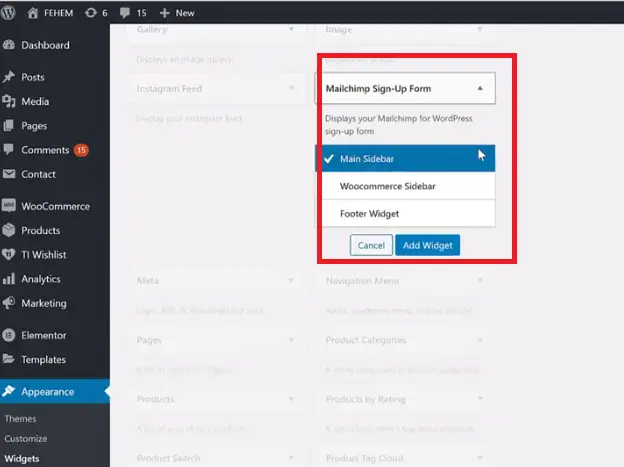
To add it on my “Main Sidebar” click on ADD WIDGET button. And you will see that the newsletter form will be added for you. Image description below.
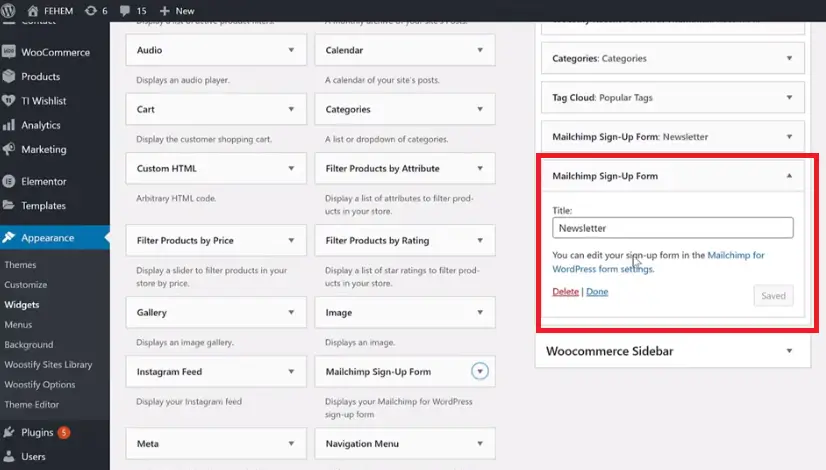
Click on DONE and if we go to our website at the sidebar, you will see the form appearing as added there.
Another greate way to capture email lead is by the use of pop-up forms. If you want to know how to add FREE POP-UP FORMS to your website using free plugin then follow this link, ADD POP-UP FORMS.
HOW TO CREATE & SCHEDULE CAMPAIGNS, RUNNING CAMPAIGN (Automation campaign, promoting products)
To do this, go back to your mailchimp account dashboard and click on the icon at the left hand side which indicates CAMPAIGN, click ALL CAMPAIGNS, you will be embraced with a new page then click on CREATE CAMPAIGN button. Image description below.

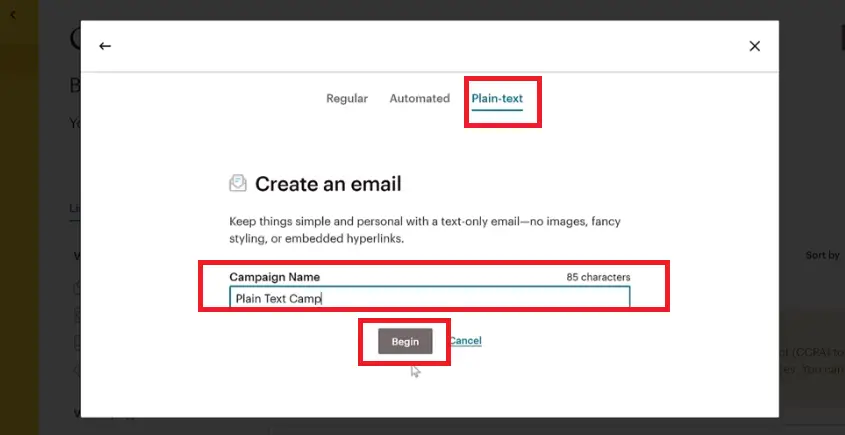
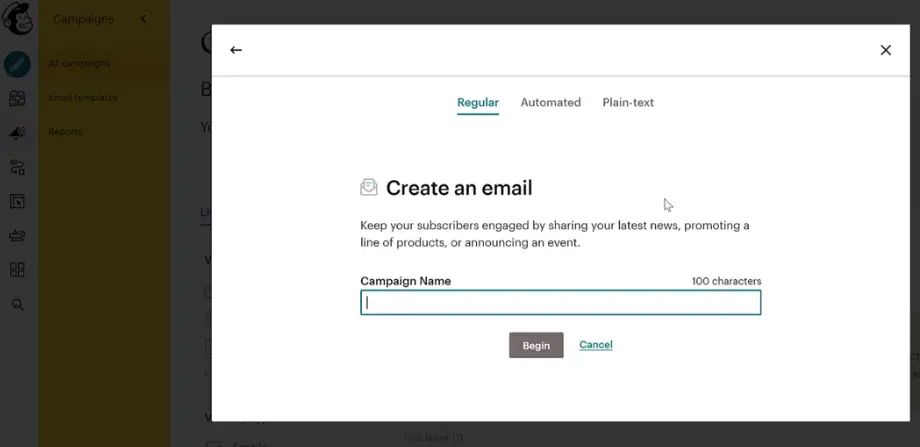
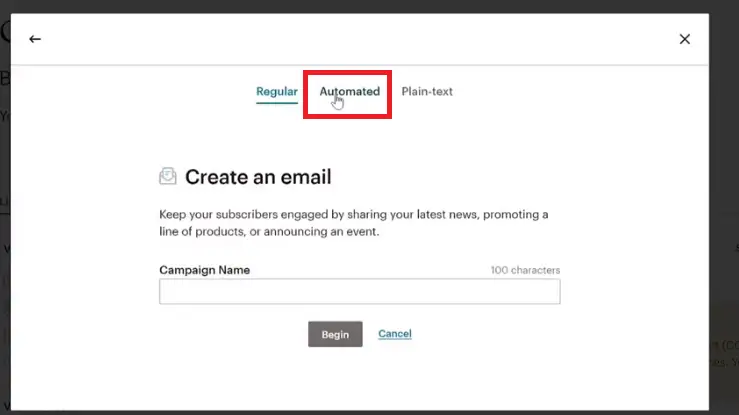
You will be embraced with a pop-up form which indicates different types of campaign. Most often you should be using “email campaign” click “email campaign” now there will be three options within the pop-up form like; Regular, Automated, and Plain-text.
PLAIN-TEXT CAMPAIGN FOR WEEKLY NEWSLETTER
Then, let’s start with the basic one which is “plain-text” click on the plain-text option, then give it a “campaign name” of your choice. Image description below.
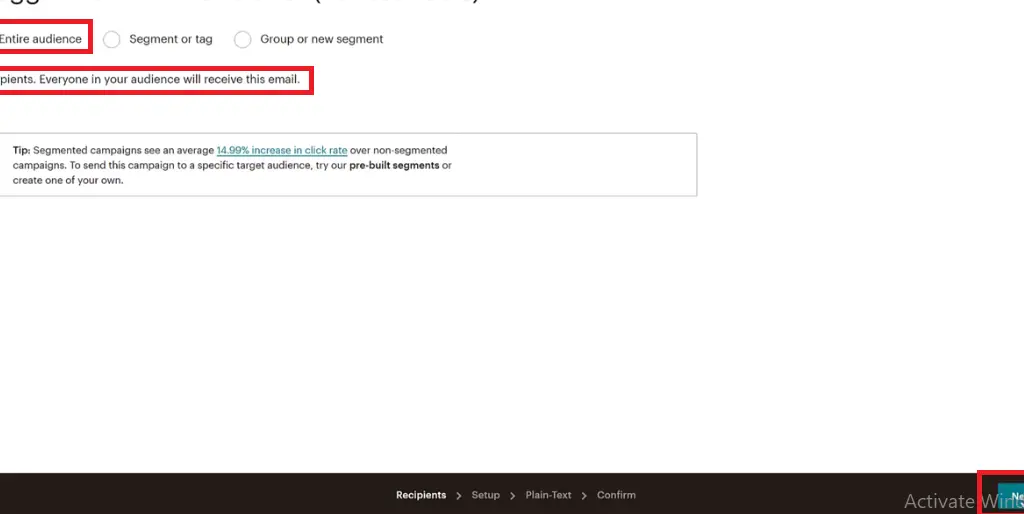
Next is to select your AUDIENCE, basically you would like to send this to the entire audience, select ENTIRE AUDIENCE which will indicate the number of recipients according to your subscribers unit. Click on NEXT after you might have done these. Image description below.
On the next page, fill in your Campaign Info as indicated by the form fields below the image and hit the NEXT button at the extrem right hand side bottom.

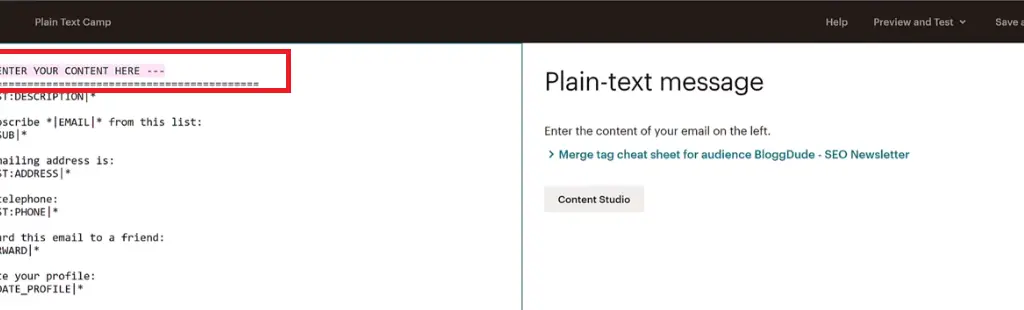
You will be embraced with a page to enter your CONTENT. Enter your content and after that hit the NEXT button. Image description below.
Sample of content added. Image descritpion below.
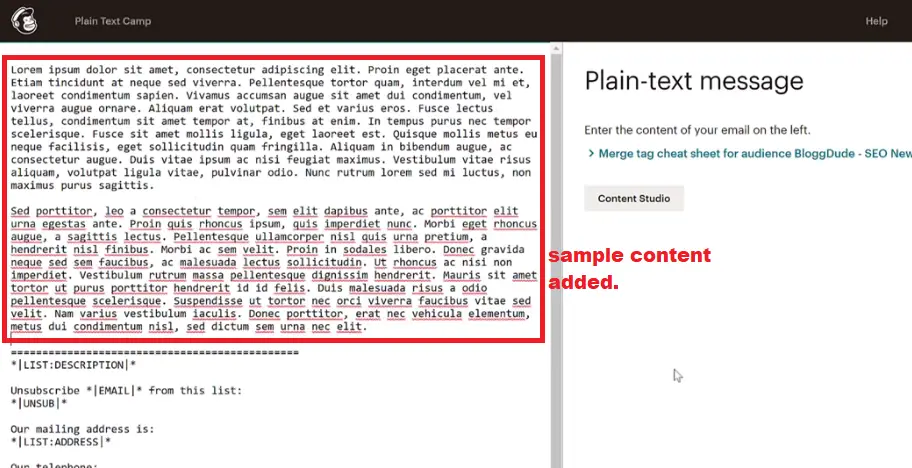
Hit the NEXT button to save your changes as usual. After that click on SEND to send your email campaign. Image descritption below.
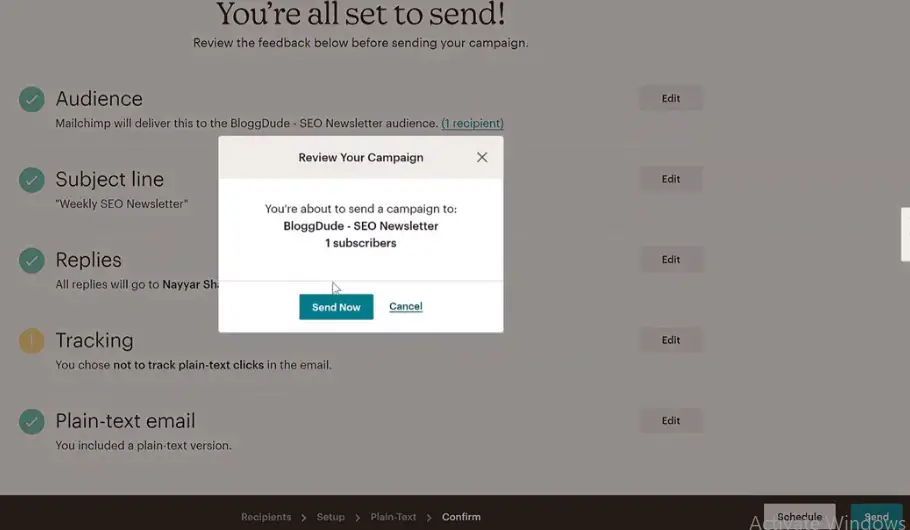
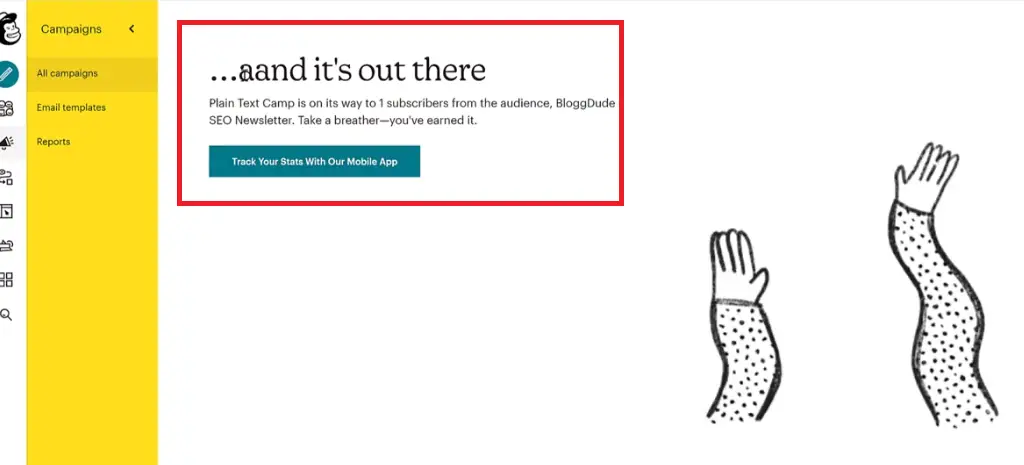
Once it is sent you will see a message like the one on the image below displayed.
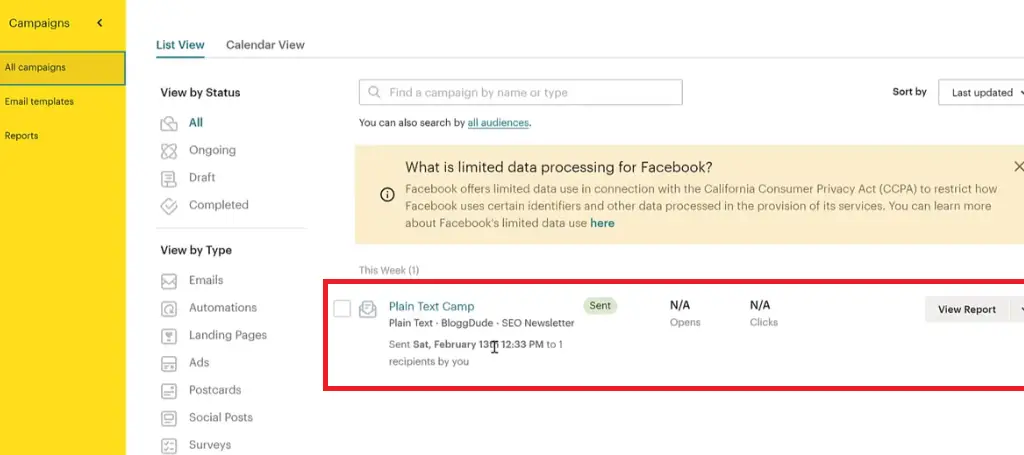
This is all completed, then you can go back to campaign by clicking it on the left hand side menu bar. You will see the sample of your campaign and the recipients with the time created and recieved. Image description below.
Going back to your email to check if it was sent. Image description below.

Everything is working as stipulated and written by you the email sender. And this message came under SPAM folder, and the reason is because, we used our Gmail email instead of business email just like i indicated at the beginning of this lesson if you could remember.
This is one of the defect of not using business email, we will learn how to create business email soon. To know about that, MAKE SURE YOU SUBSCRIBE TO OUR NEWSLETTER HERE.
REGULAR CAMPAIGN FOR WEEKLY NEWSLETTER
Go to the left hand side menu and click ALL CAMPAIGN, you will get a pop-up form, select REGULAR then enter your campaign name as usual. Image decription below.
After that, click on BEGIN to enter the next page. There you will see your email subscribers, click on ADD FORM you will see a page like the one below.
Fill all the information required and hit the SAVE button. It will take you to a page where EDIT FORM and EDIT SUBJECT will be tick-marked for you. Then to enter the content, click on DESIGN EMAIL. On the form that popped-up, select any of the EMAIL BUILDER. Image description below.

Now, it will take you to a place for you to design your template, remember, we will not be designing anything because, we’ve already created one template at the beginning of this lesson and we are going to make use of it.
On the page that came up, click on SAVED TEMPLATE. Image description below.
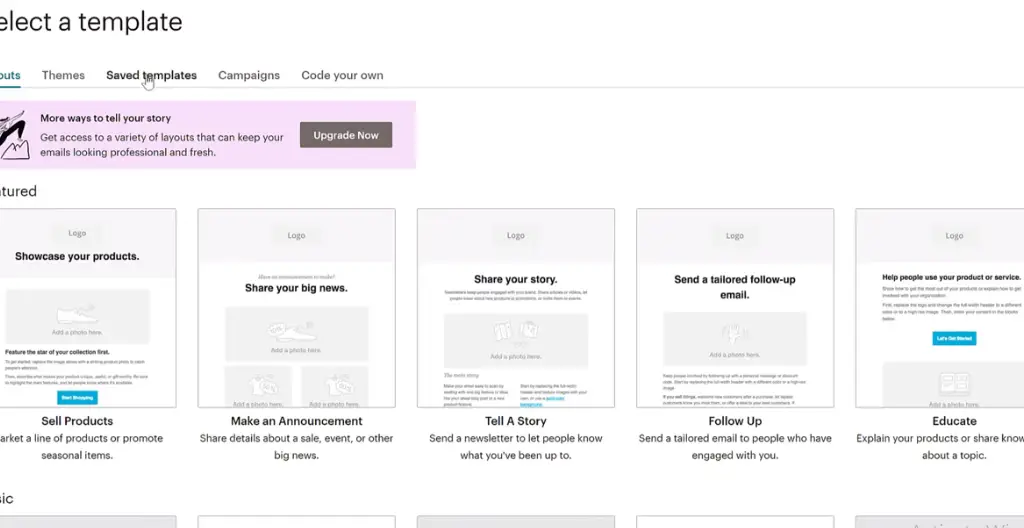
Click on the template you created and saved. Then to change the contents click on each and every one of the content section like; the Header, Body, footer and change the content by the right side corner display. Image descritption below.
Once done with the editing, you can click on CONTINUE button at the top most right hand corner of the page. You will be embraced with the edited files. Click SEND button at the top-most right hand corner of the page to send it right away. Sorry! you can’t schedule the campaign because we are using FREE version, before, it was available with the FREE version. Once it’s sent, you will get a welcome message just like before.
This is just how to send a REGULAR email to your subscribers. Now let’s see how you can send AUTOMATED email. (AUTOMATION)
AUTOMATED CAMPAIGN FOR WEEKLY NEWSLETTER
Come back to ALL CAMPAIGNS at the left-hand-side menu, click on CREATE CAMPAIGN at the right-hand-side, select EMAIL on the pop-up form and as well click AUTOMATED on the pop-up form that appeared. Image description below.
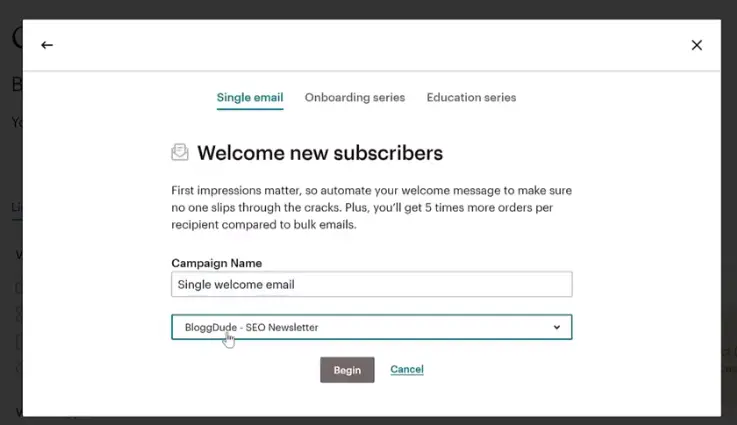
Fill the reqiured field and click on BEGIN button. You will be embraced with many options of email automation. But the basic one we should be using is; WELCOME NEW SUBSCRIBERS. Click on it as depicted by the image below.

Give your desired NAME to this campaign and select your AUDIENCE as depicted by the pop-up form on the image below.
Click on BEGIN to enter into the next page. The page indicated on the image below. If you want you can change the content by editing the various formats at the right-hand side of the form. Image description below.

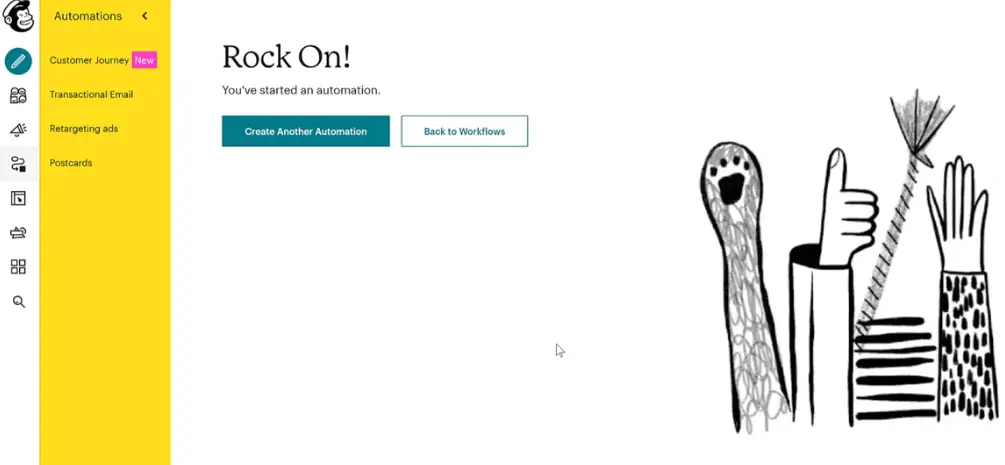
Once you are done, you can click on START SENDING button at the top-most extreme right hand side of the page with the green color. Now this will start sending them this newsletter, and whenever a new subscriber subscribes on your website they will recieve this mail. Image description of the welcome display of having sent the mail below.

With this we have treated all the different types of campaigns ranging from REGULAR, PLAIN-TEXT, AND AUTOMATION campiagns. And basically this is for all types of websites wether it’s blog, business websites etc.
Now let’s jump into specific, i want to now show you how to promote your products to your customers just like in eCommerce websites.
How to thank your customers after purchase, or recommend a product to them or even do a follow-up messaging to them.
But before we do this we have to make sure we have connected our website with the mailchimp for woocommerce plugin.
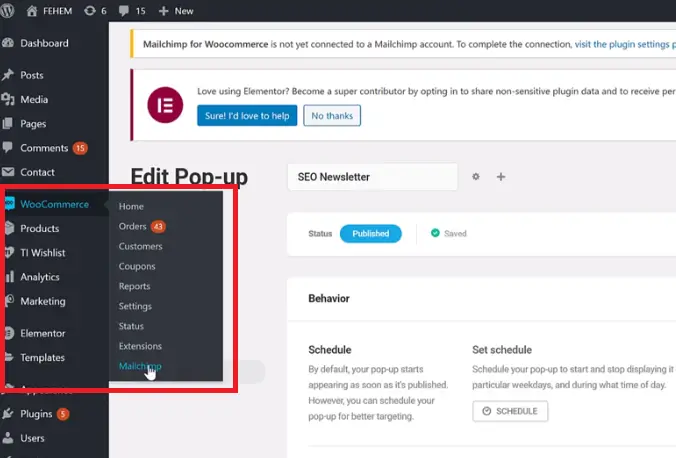
To do just that, go back to your wordpress dashboard where you will locate the WooCommerce, hover on that and click on MailChimp. Image description below.
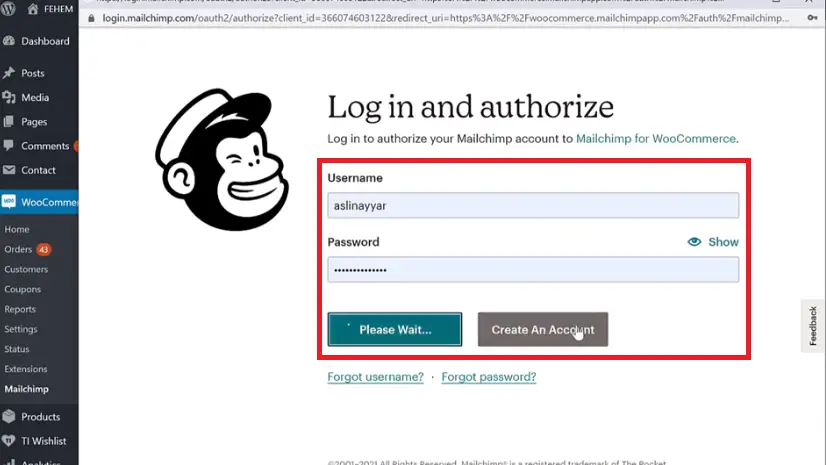
Then, click CONNECT ACCOUNT on the pop-up form and this will open a new form for you, enter your USERNAME and PASSWORD and click on LOG IN button. Image descritpion below.
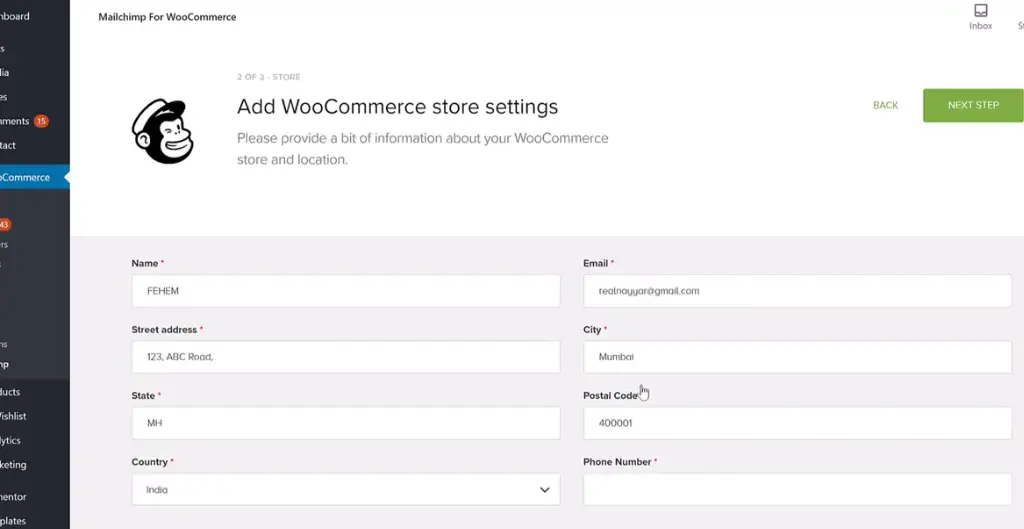
You will see a page asking you to AUTHORIZE MAILCHIMP FOR WOOCOMMERCE, click on ALLOW button to move ahead. It will start to connect, and once it finished connecting it will automatically fill-in the details for you according to the information you filled in on mailchimp.com. Image description below.
Now click on NEXT STEP button at the top-most right hand corner. On the next page do not change anything because, all had been selected for you by default. Just click on START SYNC button at the top-most extreme right hand side corner.
Automatically, this will start syncking your customers with your newsletter.Which means when a customer added anything on their cart, that customer will automatically be added to your audience list.
Let me show you the important of connecting your website with mailchimp. (eCommerce)
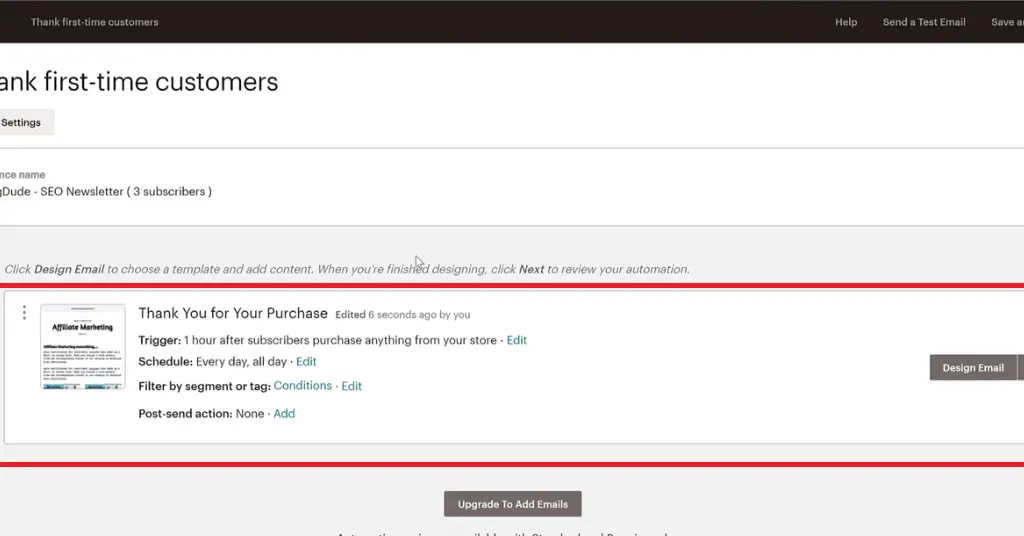
Let’s create a new campaign and use it to thank our first customer. As usual go to ALL CAMPAIGN and click on CREATE CAMPAIGN, select EMAIL as the format and select AUTOMATED as well, this time click on eCOMMERCE and there are many options of email format you can select, let’s use the basic option of THANK FIRST-TIME CUSTOMERS, click on it select the options as indicated and also your email list and click on BEGIN button.
Remember, this is just a single email and if you want you can send a series of email as well. Image description below.

Click on DESIGN EMAIL, you will be embraced with “email information” where you can design your email, fill in the form as stipulated by the image below.

Click on NEXT and select any one of those templates and create your own template. Or if you want, you can use anyone of your saved templates.
Follow the same process we’ve used in creating and editing our already saved template and after that click on SAVE & CONTINUE button at the bottom-right-hand-side of the page to save your changes and continue. Image description below.
Click on the NEXT button at the bottom right corner, and go ahead to hit the START SENDING button. Image description below.

Then when ever a person purchased something on your website, after one hour this email will be sent to them because, we’ve set this to automatically work like that. Image description of the automation sent will look like this below.
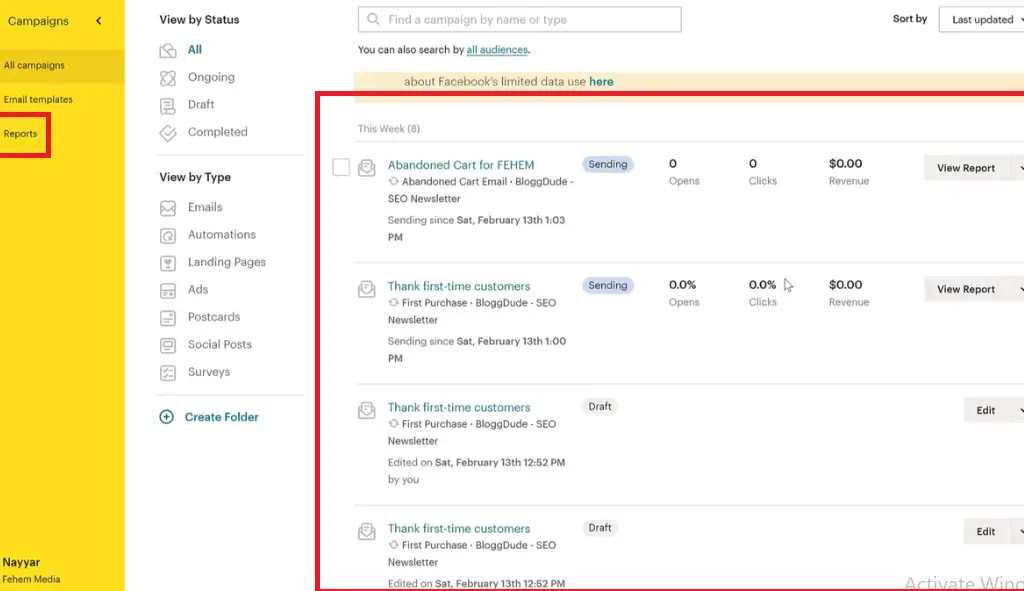
Then, to read your reports go to CAMPAIGN ICON at the extreme top left hand side of the menu bar, and you can see the reports running. Image descritption below.
We are done with the process of sending mails either automated or manually sent. Now, let’s talk briefly about how you can sell products or services to these email subscribers.
SELL PRODUCTS OR SERVICES TO EMAIL SUBSCRIBERS
Just like we made mention before, that your email list subscribers are equvalent to your bank account because, they are the individuals who will put their money into your pocket in exchange of services or products you deliver to them.
But before you think of selling services or products to your email subscribers you must have established cordial relationship that will enable them have concrete trust on where you are.
This relationship may stem from delivering helpful services or products for FREE within periods of long time. With this, you must have established yourself as a reputable individual capable of solving any of their problems. Which will make it possible for them to trust you with their hard-earned money.
Then, how can you sell your services or products to your email list subscribers? You can achieve this by attaching your sales-page description on your daily or weekly newsletters. Or, you can as well draft a seperate newsletter targetting sales. Just like we learned on the practical aspect of sending mails using mailchimp.com.
BLOGTOSTAY TIPS: Take note, before you do so, make sure you have established a concrete relationship with you subscribers.
Now, let’s talk about selling your entire email list for a huge amount of money.
SELL YOUR ENTIRE EMAIL FOR HUGE AMOUNT OF MONEY
Most of us have heared where it was talked in the internet about certain individuals selling their email list worth of millions of dollars. And may be not.
But let me assure you, it is worth it. Individuals have sold their list of email collected to huge amount of money after few years of establishing such venture beyond their own imagination.
A typical example are these two gentle men, Alex Lieberman and Austin Rief who sold Morning Brew at the rate of $75 million within a span of five years. Source: Morning Brew.
Why not start your own email marketing platforms now. There are turns of free platforms you can start with like SUBSTACKS.
CONCLUSION:
It is better to have 1000 email subscribers than to have 100,000 visitors to your websites. Email list accumulation will guarantee utmost intimacy with you and your customers.
I will encourage you to start one today. And when starting remember, there are some processes you have to follow. Just as stipulated by an experienced internet savvy for over a decade now. And these processes are as indicated below.
These are the processes you can follow to engage on these email marketing. And they are:
— MEANS OF ACCUMULATING THE EMAILS (LEAD GENERATION)
This entails creation of email collection forms either pop-up or embeded within strategic places in your website. Go to FREE platforms like substack to start immediately.
— SUSTAINING THE EMAIL (NEWSLETTERS)
Will help you create intimacy with your email list subscribers. Atleast weekly newsletter is enough to create this rapport.
— TOOLS TO USE (AUTORESPONDERS)
When you talk of tools to aid you in practicing this email marketing, you can’t go without the giant in this fieled called Mailchimp. It’s FREE and also PAID. Follow the practical tutorial on this lesson and you will be fine with the process.
— SELL PRODUCTS OR SERVICES TO EMAIL SUBSCRIBERS
Your defined level of subscribers can quickly buy your products or service unlike thousands of instagram follower.
— SELL YOUR ENTIRE EMAIL FOR HUGE AMOUNT OF MONEY
Trust me, many have sold their email list of subscribers into millions of dollars. Just like i stipulated in the example above. Why not start yours today, who knows who will be the favoured victim.
Thanks and remain blessed.
I hope this lesson helped you, and if it did help you, do not forget to share, and drop your comment on this platform.
Please, Do not forget to Stay Blogging and never leave.


I just like the helpful information you provide in your articles
I appreciate that.
I truly appreciate your technique of writing a blog. I added it to my bookmark site list and will
Thanks for bookmarking us.
I very delighted to find this internet site on bing, just what I was searching for as well saved to fav
Welcome.
Good post! We will be linking to this particularly great post on our site. Keep up the great writing
Thanks for connecting.
Awesome! Its genuinely remarkable post, I have got much clear idea regarding from this post
Regards dear.
Great information shared.. really enjoyed reading this post thank you author for sharing this post .. appreciated
I appreciate you too.
I just like the helpful information you provide in your articles
Thanks dear.
Great information shared.. really enjoyed reading this post thank you author for sharing this post .. appreciated
Thanks dear.
Pretty! This has been a really wonderful post. Many thanks for providing these details.
Remain blessed Bro
Awesome! Its genuinely remarkable post, I have got much clear idea regarding from this post
Thanks
I appreciate you sharing this blog post. Thanks Again. Cool.
Thanks
This is really interesting, You’re a very skilled blogger. I’ve joined your feed and look forward to seeking more of your magnificent post. Also, I’ve shared your site in my social networks!
Thanks for joining our feed
For the reason that the admin of this site is working, no uncertainty very quickly it will be renowned, due to its quality contents.
Good.
Great information shared.. really enjoyed reading this post thank you author for sharing this post .. appreciated
Appreciate you too
This is my first time pay a quick visit at here and i am really happy to read everthing at one place
You are welcome
I’m often to blogging and i really appreciate your content. The article has actually peaks my interest. I’m going to bookmark your web site and maintain checking for brand spanking new information.
You are welcome. Thanks for bookmarking us.
I am truly thankful to the owner of this web site who has shared this fantastic piece of writing at at this place.
Hurrah, that’s what I was looking for, what a data!
present here at this website, thanks admin of this web site.
I saw similar here: Najlepszy sklep
I hope you enjoyed the content. Remember to share with your friends and well-wishers. And do not forget to subscribe to our newsletter for more articles.
Fantastic goods from you, man. I have understand your stuff previous to and you are just
extremely fantastic. I actually like what you have acquired here, certainly like what you are
stating and the way in which you say it. You make it enjoyable and
you still care for to keep it sensible. I can not wait to read
much more from you. This is really a wonderful website.
I saw similar here: sklep internetowy and also here: sklep internetowy
Thanks a lot dear.
Your blog post had me hooked from the first sentence.
Thanks, dear. Remember to stay blogging and never leave.
I am currently writing a paper and a bug appeared in the paper. I found what I wanted from your article. Thank you very much. Your article gave me a lot of inspiration. But hope you can explain your point in more detail because I have some questions, thank you.
Hi 20bet,
I’ve seen a lot of your comments and never approved by our admin. Now, what are the questions boggling your mind?