1. Introduction to AI Tools in WordPress
i). What are AI tools?:
AI tools are software, applications, or platforms that leverage artificial intelligence (AI) techniques to perform specific tasks or solve problems.
These tools utilize machine learning, deep learning, natural language processing, computer vision, and other AI technologies to automate processes, analyze data, make predictions, and assist with decision-making.
Below are some common types of AI tools and their areas of application:
a). Machine Learning Platforms: These frameworks and libraries allow developers and data scientists to build, train, and deploy machine learning models. Examples include TensorFlow, PyTorch, and scikit-learn.
b). Chatbots and Virtual Assistants: These AI-powered tools can understand and respond to user queries in natural language.
They are used in customer support, information retrieval, and more. Examples include Siri, Alexa, and chatbots on websites.
c). Natural Language Processing (NLP) Tools: These tools can understand, interpret, and generate human language. They are used in sentiment analysis, text summarization, translation, and more. Examples include spaCy, NLTK, and BERT.
d). Computer Vision Tools: These tools can analyze and interpret visual information from images or videos. They are used in facial recognition, object detection, medical imaging, and more. Examples include OpenCV and TensorFlow Object Detection API.
e). Predictive Analytics Tools: These tools use AI to analyze historical data and make predictions about future events or trends. They are used in finance, healthcare, marketing, and more. Examples include IBM Watson Analytics and RapidMiner.
f). Robotic Process Automation (RPA) Tools: These tools automate repetitive tasks using AI and machine learning algorithms. They are used to streamline business processes and improve efficiency. Examples include UiPath and Automation Anywhere.
Now, let’s look into the 5 benefits of using AI tools in WordPress.
ii). 5 Benefits of using AI tools in WordPress:
a). Enhanced User Experience: AI can personalize content and provide instant support through chatbots, improving user engagement and satisfaction.
b). Improved Content Optimization: AI tools can suggest SEO improvements and content strategies based on data analysis, boosting website visibility and effectiveness.
c). Efficient Website Management: AI automates routine tasks like updates and security scans, saving time and reducing errors.
d). Data-Driven Insights: AI processes data to offer actionable analytics, helping website owners make informed decisions and predictions.
e). Enhanced Security: AI-powered tools can detect and prevent cyber threats in real-time, strengthening website defences and user data protection.
Now is the time to go deep into the creation of these AI generator tools for our websites.
2. Creating a Story Generator in WordPress
i). Conceptualizing the Story Generator:
Now, we are going to achieve this in 4 steps, and they are:
STEP 1:- Installing the required plugin.
STEP 2:- Including the PHP Code in the WPCode snippet.
STEP 3:- Including the HTML, CSS, AND JAVA SCRIPT within the WordPress Page.
STEP 4:- Get Your API Secret at Openai
Then let us begin……
STEP 1:- Installing The Required Plugin:
Log in to your WordPress dashboard and at the extreme left-hand side where the menu is located. Select ‘Plugin’ hover your mouse cursor on it and select ‘Add New Plugin‘.
While you are at the plugin directory page, go straight to the right-hand corner where you will see the search button and type in ‘WPCode‘. The plugin will appear, install and activate the plugin. Image description below:

This step 1 is finished, then let’s get to step 2.
STEP 2:- Including The PHP Code In The WPCode Snippet:
We have installed the required plugin called WPCode Snippet. If you go to the left-hand side menu you will see the symbol as ‘Code Snippets.’
Hover your mouse cursor on it and select ‘+ Add Snippets’ to add a new snippet. You will be taken to a snippet directory page that looks like the image below:
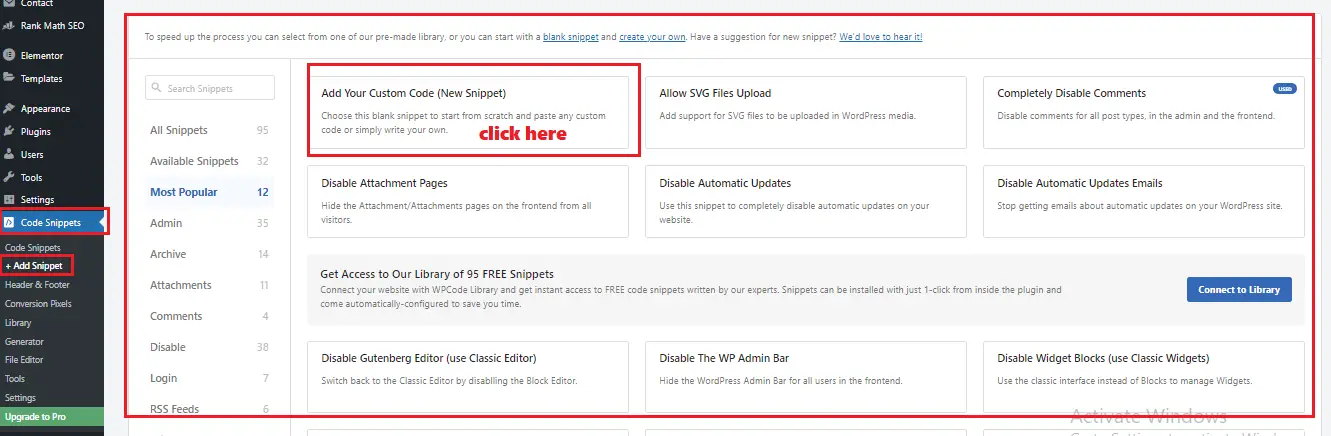
Click on ‘Use Snippet’ as indicated by the image above. You will be embraced with a page that looks like the image below:
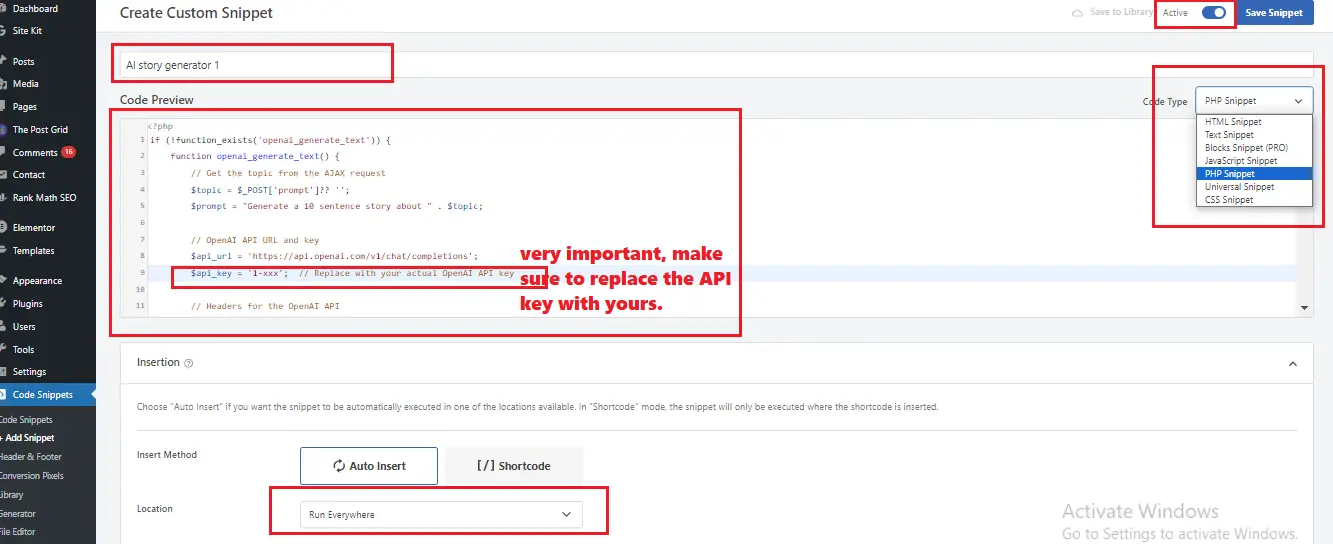
Give it any title of your choice, copy the PHP code as indicated below and paste it within the ‘Code Preview’ at the extreme right-hand side where you will see the ‘Code Type’ drop-down menu, click on it and select ‘PHP Snippet’.
Then just at the top of the ‘PHP Snippet’, you will see a radio button with ‘inactive’ before the ‘Save Snippet’ button. Click on it to highlight it.
Scroll down and at the left-hand side you will see ‘Location’ Click on the drop-down menu and select ‘Run Everywhere’ if it is not selected. Because it automatically selects itself.
After that, head over to the top-right-hand side and click ‘Save Snippet’ to save your changes.
NOTE: Make sure to replace your own API secret key as indicated by the image above. Very important without which it cannot work.
The PHP Code is below:
if (!function_exists('openai_generate_text')) {
function openai_generate_text() {
// Get the topic from the AJAX request
$topic = $_POST['prompt']?? '';
$prompt = "Generate a 10 sentence story about " . $topic;
// OpenAI API URL and key
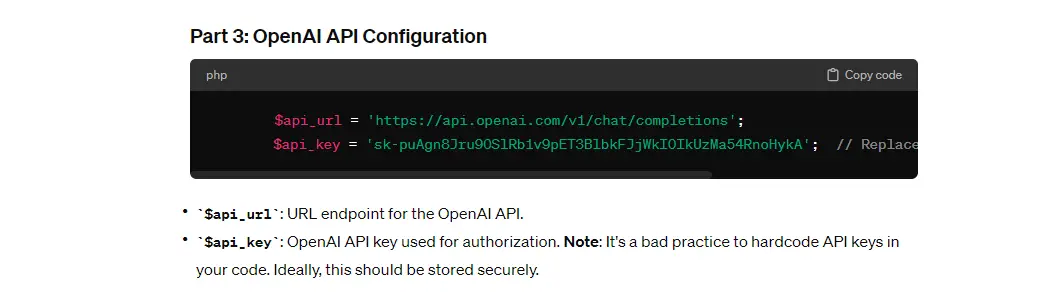
$api_url = 'https://api.openai.com/v1/chat/completions';
$api_key = '1-xxx'; // Replace with your actual OpenAI API key
// Headers for the OpenAI API
$headers = [
'Content-Type' => 'application/json',
'Authorization' => 'Bearer ' . $api_key
];
// Body for the OpenAI API
$body = [
'model' => 'gpt-3.5-turbo',
'messages' => [['role' => 'user', 'content' => $prompt]],
'temperature' => 0.7
];
// Args for the WordPress HTTP API
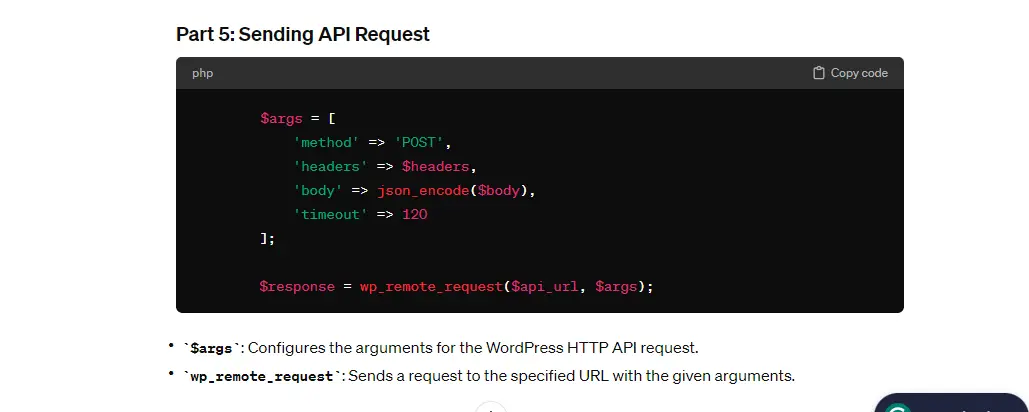
$args = [
'method' => 'POST',
'headers' => $headers,
'body' => json_encode($body),
'timeout' => 120
];
// Send the request
$response = wp_remote_request($api_url, $args);
// Handle the response
if (is_wp_error($response)) {
$error_message = $response->get_error_message();
wp_send_json_error("Something went wrong: $error_message");
} else {
$body = wp_remote_retrieve_body($response);
$data = json_decode($body, true);
if (json_last_error() !== JSON_ERROR_NONE) {
wp_send_json_error('Invalid JSON in API response');
} elseif (!isset($data['choices'])) {
wp_send_json_error('API request failed. Response: ' . $body);
} else {
wp_send_json_success($data);
}
}
// Always die in functions echoing AJAX content
wp_die();
}
}
if (!function_exists('ajax_openai_generate_text')) {
add_action('wp_ajax_openai_generate_text', 'openai_generate_text');
add_action('wp_ajax_nopriv_openai_generate_text', 'openai_generate_text');
}
3. Break Down The PHP Code Into Parts And The Functionality Of Each Part:
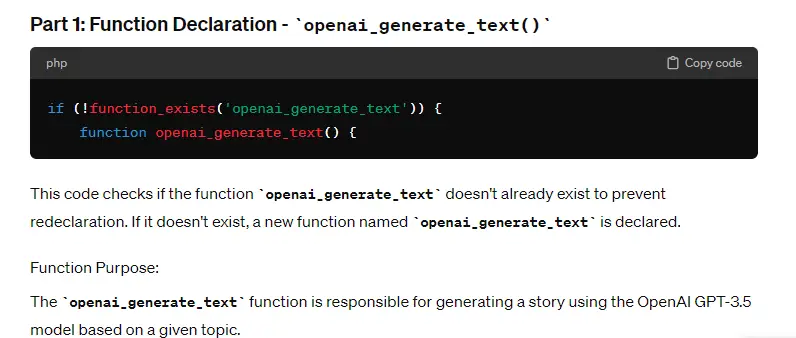
Part 1: Function Declaration – ‘openai_generate_text()’
Part 2: Getting the Topic

Part 3: OpenAI API Configuration:
Part 4: API Request Configuration:

Part 5: Sending API Request:
Part 6: Handling API Response:

Part 7: AJAX Action Hooks:

That’s the breakdown of the provided PHP code. It’s essentially an AJAX handler for generating a story using the OpenAI GPT-3.5 model based on a user-provided topic.
Use it to analyze the other projects and it will help you know where to edit any function to suit your project.
STEP 3:- Including The HTML, CSS, AND JAVASCRIPT Within The WordPress Page:
First, we are going to create a page. To do that, head over to the left-hand side menu of the WordPress dashboard and locate ‘Pages’ hover your mouse cursor on it and select ‘Add New Page’, and you will be taken to a page that looks like the image below:
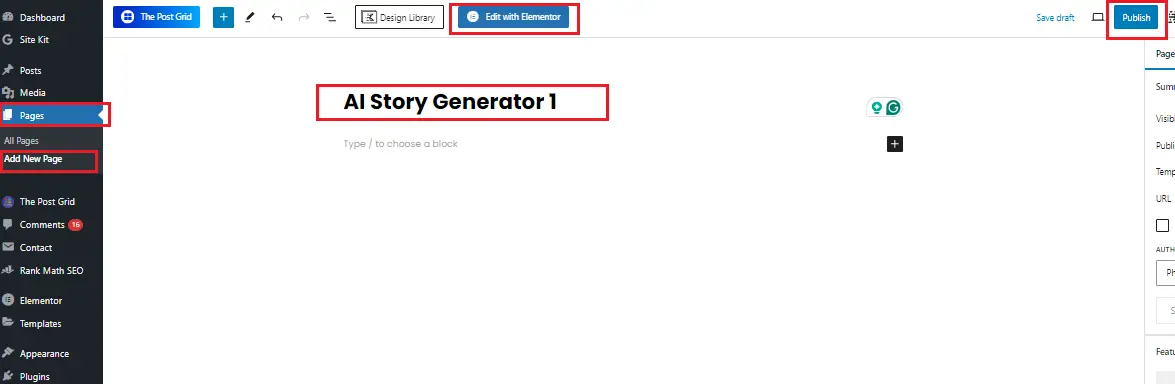
Type in the page’s title, and at the extreme right-hand side click on ‘Publish’ to publish your page. After that, click ‘Edit with Elemento’ and you will be taken to a page that looks like the one below:
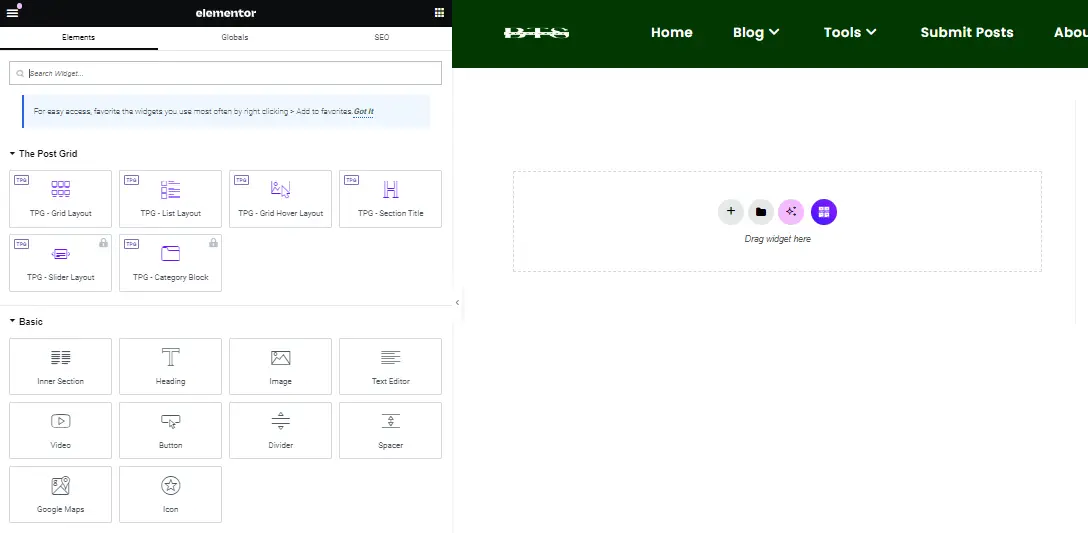
Then to design your page and add the HTML, CSS, AND JAVASCRIPT CODE, go to the left-hand side and within ‘Basic’ place your mouse cursor on ‘Heading’ with capital T as an indication, click, hold, and drag to the centre where you see the crosshair(+) and release your hand to add heading section. Image description below:
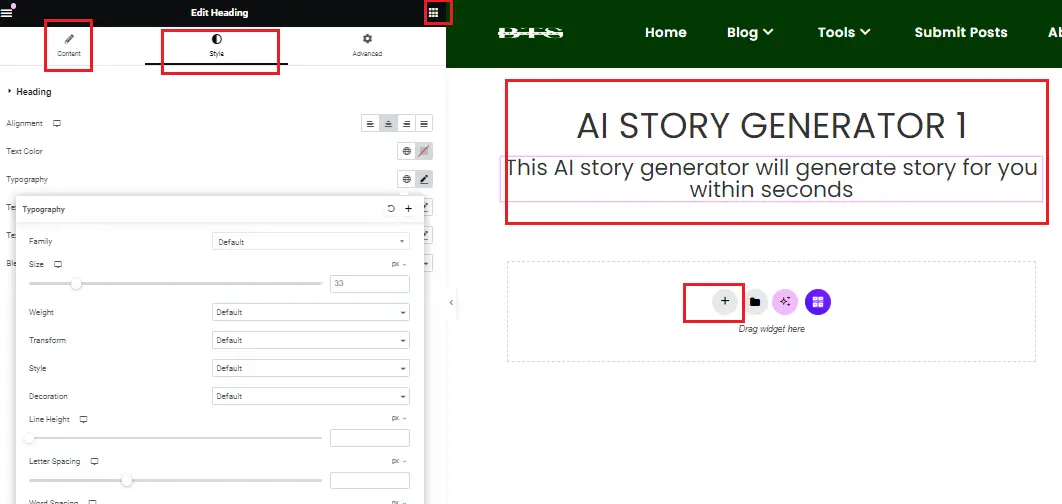
Then by the left-hand side form option bearing Title, you can change it to any title you want. Go ahead and style your content by making use of the function.
To add the code, go to the left-hand side top and click on the nine-dotted point as indicated by the image below:
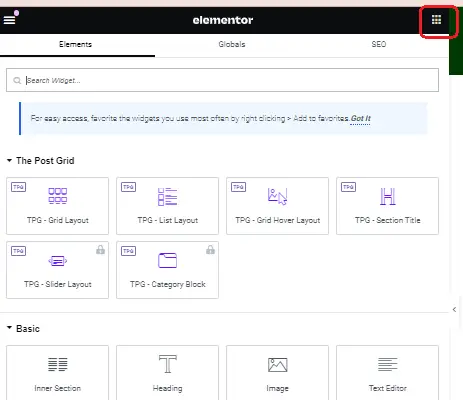
This will bring out the formal functions. Now, type ‘HTML’ on the search button below it. Place your mouse on it as usual hold and drag under the description at the middle of your page and release your hands to add the code box (where the HTML, CSS, AND JAVASCRIPT CODE WILL BE ADDED). Image description below:
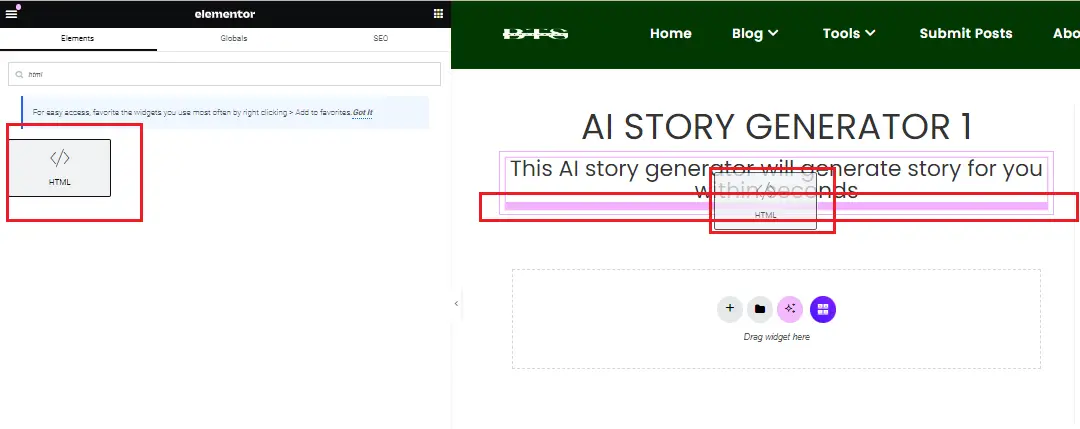
After the code box is added, the page will look like the image below:
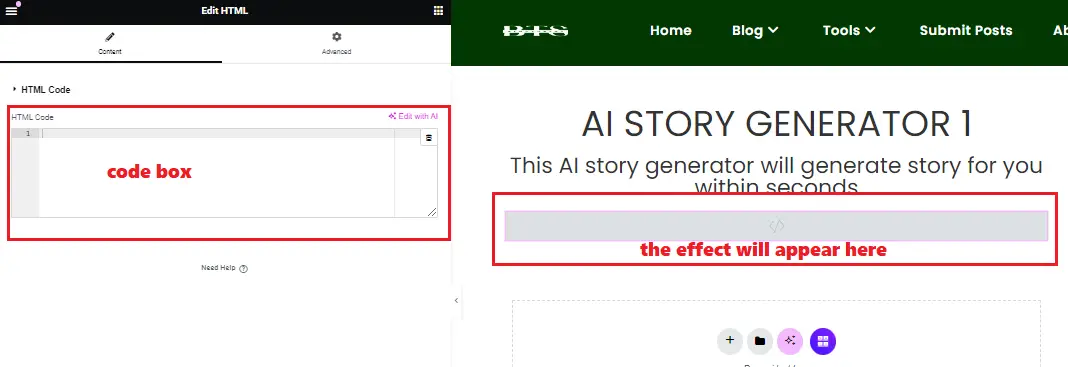
Copy the code and add it to the form on the left-hand side. The HTML AND CSS CODE, then the JAVASCRIPT CODE will be added at the bottom. The image below will depict the outlook:
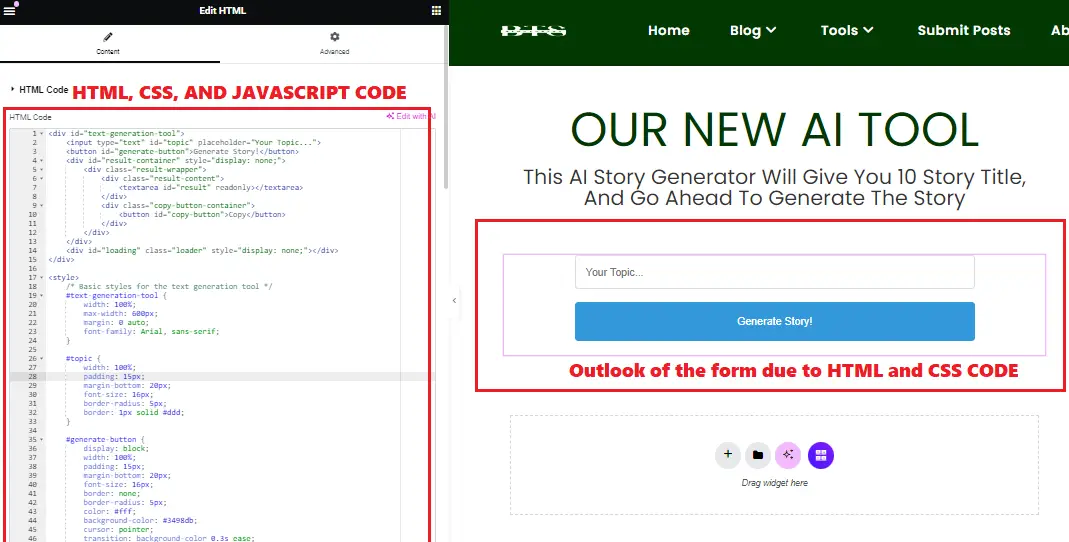
The HTML & CSS CODE:
<div id="text-generation-tool">
    <input type="text" id="topic" placeholder="Your Topic...">
    <button id="generate-button">Generate Story!</button>
    <div id="result-container" style="display: none;">
        <div class="result-wrapper">
            <div class="result-content">
                <textarea id="result" readonly></textarea>
            </div>
            <div class="copy-button-container">
                <button id="copy-button">Copy</button>
            </div>
        </div>
    </div>
    <div id="loading" class="loader" style="display: none;"></div>
</div>

<style>
    /* Basic styles for the text generation tool */
    #text-generation-tool {
        width: 100%;
        max-width: 600px;
        margin: 0 auto;
        font-family: Arial, sans-serif;
    }

    #topic {
        width: 100%;
        padding: 15px;
        margin-bottom: 20px;
        font-size: 16px;
        border-radius: 5px;
        border: 1px solid #ddd;
    }

    #generate-button {
        display: block;
        width: 100%;
        padding: 15px;
        margin-bottom: 20px;
        font-size: 16px;
        border: none;
        border-radius: 5px;
        color: #fff;
        background-color: #3498db;
        cursor: pointer;
        transition: background-color 0.3s ease;
    }

    #generate-button:hover {
        background-color: #2980b9;
    }

    #result-container {
        display: none;
        margin-bottom: 20px;
    }

    .result-wrapper {
        position: relative;
        overflow: hidden;
    }

    .result-content {
        display: flex;
    }

    #result {
        flex: 1;
        height: 400px;
        padding: 15px;
        font-size: 16px;
        border-radius: 5px;
        border: 1px solid #ddd;
        background-color: #f9f9f9;
    }

    .copy-button-container {
        margin-top: 10px;
        text-align: right;
    }

    #copy-button {
        padding: 8px 12px;
        font-size: 14px;
        border: none;
        border-radius: 5px;
        color: #fff;
        background-color: #3498db;
        cursor: pointer;
        transition: background-color 0.3s ease;
    }

    #copy-button:hover {
        background-color: #2980b9;
    }

    /* CSS for the loader */
    .loader {
        display: block;
        margin: 50px auto;
        border: 16px solid #f3f3f3; /* Light grey */
        border-top: 16px solid #3498db; /* Blue */
        border-radius: 50%;
        width: 50px;
        height: 50px;
        animation: spin 1s linear infinite;
    }

    @keyframes spin {
        0% { transform: rotate(0deg); }
        100% { transform: rotate(360deg); }
    }
</style>
The JAVASCRIPT CODE:
<script>
    document.getElementById("generate-button").addEventListener("click", function(e){
        e.preventDefault();


        var generateButton = document.getElementById("generate-button");

        if (generateButton.disabled) {
            return; // Prevent multiple clicks while content is being generated
        }

        generateButton.disabled = true;


        var topic = document.getElementById('topic').value;
        var prompt = "Generate a 10 sentence story about " + topic;
        var loading = document.getElementById('loading');
        var result = document.getElementById('result');
        var resultC = document.getElementById('result-container');


        loading.style.display = 'block';
        result.style.display = 'none'; // hide result textarea
        resultC.style.display = 'none';


        var formData = new FormData();
        formData.append('action', 'openai_generate_text');
        formData.append('prompt', prompt);

        fetch('/wp-admin/admin-ajax.php', {
            method: 'POST',
            body: formData
        })
        .then(response => response.json())
        .then(data => {
            loading.style.display = 'none';
            if(data.success) {
                result.value = data.data.choices[0].message.content;
                result.style.display = 'block'; // show result textarea
                resultC.style.display = 'block';
                generateButton.disabled = false;
            } else {
                result.value = 'An error occurred: ' + data.data;
                result.style.display = 'block'; // show result textarea
                resultC.style.display = 'block';
                generateButton.disabled = false;
            }
        })
        .catch(error => {
            loading.style.display = 'none';
            result.value = 'An error occurred: ' + error.message;
            result.style.display = 'block'; // show result textarea
            resultC.style.display = 'block';
            generateButton.disabled = false;

        });
    });

    var copyButton = document.getElementById('copy-button');
    copyButton.addEventListener('click', function() {
        var result = document.getElementById('result');
        result.select();
        document.execCommand('copy');
        alert('Copied to clipboard!');
    });
</script>
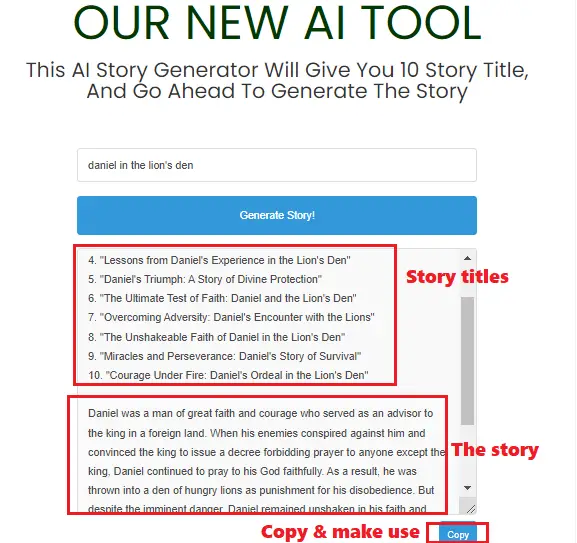
Then let us test-run our project with a story like ‘Daniel in the Lion’s Den’ This model is supposed to give us ten story titles, and equally go ahead to tell the story. That is the uniqueness of other story generator models. Image description below:
STEP 4:- Get Your API Secret Key at Openai:
Go to the Openai URL (https://platform.openai.com/) to get registered. It’s free and after that log in.
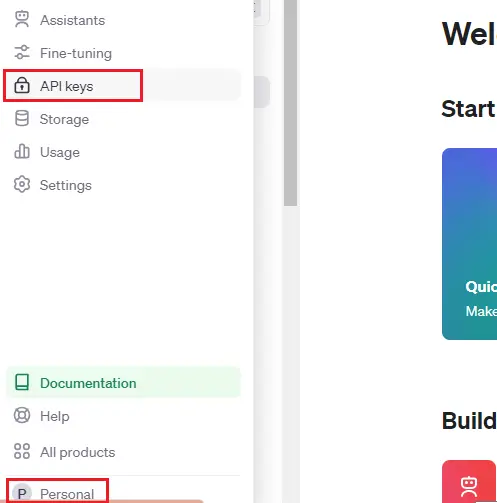
After logging in, at the bottom extreme left-hand side you will see a sign of P representing ‘personal.’ Hover your mouse cursor on it and other sub-menu will display.
Move up in the same direction to ‘API Keys’ and click on it. Image description below;
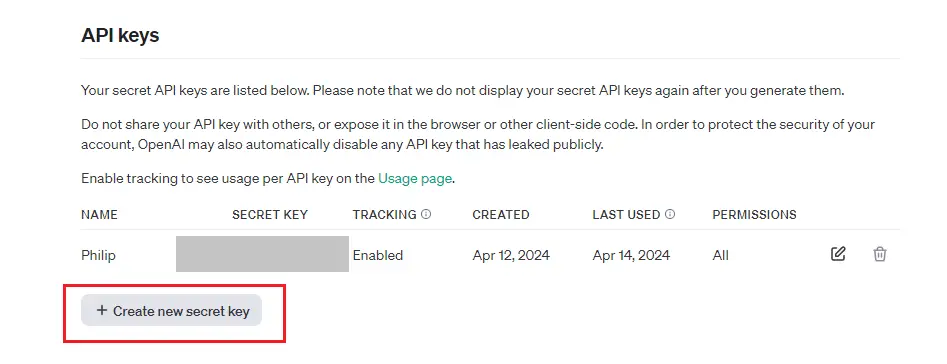
You will be taken to where you can get your already created API Keys or create new ones if you don’t have any created. To create a new one, click on the ‘Create New Secret Key’ and it will be generated for you.
Remember to keep it saved in your document area and do not allow anybody to see your secret key. Image description below:
4. Building a Blog Title Generator In WordPress:
Building a blog title generator in WordPress is the same as the story generator, but the only difference is the codes.
You will just follow the same procedure as stipulated on the story generator. I will give you the code to make use of, just follow the process above.
The PHP CODE FOR THE WPCODE SNIPPET:
function openai_generate_text() {
    // Get the topic from the AJAX request
    $topic = $_POST['prompt'];
	$prompt = "Generate 10 Blog Titles About " . $topic;

    // OpenAI API URL and key
    $api_url = 'https://api.openai.com/v1/chat/completions';
    $api_key = 'XX-1xxx';  // Replace with your actual OpenAI API key

    // Headers for the OpenAI API
    $headers = [
        'Content-Type' => 'application/json',
        'Authorization' => 'Bearer ' . $api_key
    ];

    // Body for the OpenAI API
    $body = [
        'model' => 'gpt-3.5-turbo',
        'messages' => [['role' => 'user', 'content' => $prompt]],
        'temperature' => 0.7
    ];

    // Args for the WordPress HTTP API
    $args = [
        'method' => 'POST',
        'headers' => $headers,
        'body' => json_encode($body),
        'timeout' => 120
    ];

    // Send the request
    $response = wp_remote_request($api_url, $args);

    // Handle the response
    if (is_wp_error($response)) {
        $error_message = $response->get_error_message();
        wp_send_json_error("Something went wrong: $error_message");
    } else {
        $body = wp_remote_retrieve_body($response);
        $data = json_decode($body, true);

        if (json_last_error() !== JSON_ERROR_NONE) {
            wp_send_json_error('Invalid JSON in API response');
        } elseif (!isset($data['choices'])) {
            wp_send_json_error('API request failed. Response: ' . $body);
        } else {
            wp_send_json_success($data);
        }
    }

    // Always die in functions echoing AJAX content
   wp_die();
}

add_action('wp_ajax_openai_generate_text', 'openai_generate_text');
add_action('wp_ajax_nopriv_openai_generate_text', 'openai_generate_text');
The HTML & CSS CODE FOR THE WORDPRESS PAGE:
<div id="text-generation-tool">
    <input type="text" id="topic" placeholder="Your Topic...">
    <button id="generate-button">Generate Blog Titles</button>
    <div id="result-container" style="display: none;">
        <div class="result-wrapper">
            <div class="result-content">
                <textarea id="result" readonly></textarea>
            </div>
            <div class="copy-button-container">
                <button id="copy-button">Copy</button>
            </div>
        </div>
    </div>
    <div id="loading" class="loader" style="display: none;"></div>
</div>

<style>
    /* Basic styles for the text generation tool */
    #text-generation-tool {
        width: 100%;
        max-width: 600px;
        margin: 0 auto;
        font-family: Arial, sans-serif;
    }

    #topic {
        width: 100%;
        padding: 15px;
        margin-bottom: 20px;
        font-size: 16px;
        border-radius: 5px;
        border: 1px solid #ddd;
    }

    #generate-button {
        display: block;
        width: 100%;
        padding: 15px;
        margin-bottom: 20px;
        font-size: 16px;
        border: none;
        border-radius: 5px;
        color: #fff;
        background-color: #3498db;
        cursor: pointer;
        transition: background-color 0.3s ease;
    }

    #generate-button:hover {
        background-color: #2980b9;
    }

    #result-container {
        display: none;
        margin-bottom: 20px;
    }

    .result-wrapper {
        position: relative;
        overflow: hidden;
    }

    .result-content {
        display: flex;
    }

    #result {
        flex: 1;
        height: 400px;
        padding: 15px;
        font-size: 16px;
        border-radius: 5px;
        border: 1px solid #ddd;
        background-color: #f9f9f9;
    }

    .copy-button-container {
        margin-top: 10px;
        text-align: right;
    }

    #copy-button {
        padding: 8px 12px;
        font-size: 14px;
        border: none;
        border-radius: 5px;
        color: #fff;
        background-color: #3498db;
        cursor: pointer;
        transition: background-color 0.3s ease;
    }

    #copy-button:hover {
        background-color: #2980b9;
    }

    /* CSS for the loader */
    .loader {
        display: block;
        margin: 50px auto;
        border: 16px solid #f3f3f3; /* Light grey */
        border-top: 16px solid #3498db; /* Blue */
        border-radius: 50%;
        width: 50px;
        height: 50px;
        animation: spin 1s linear infinite;
    }

    @keyframes spin {
        0% { transform: rotate(0deg); }
        100% { transform: rotate(360deg); }
    }
</style>
The JAVASCRIPT CODE:
<script>
    document.getElementById("generate-button").addEventListener("click", function(e){
        e.preventDefault();


        var generateButton = document.getElementById("generate-button");

        if (generateButton.disabled) {
            return; // Prevent multiple clicks while content is being generated
        }

        generateButton.disabled = true;


        var topic = document.getElementById('topic').value;
        var prompt = "Generate 10 Blog Titles About " + topic;
        var loading = document.getElementById('loading');
        var result = document.getElementById('result');
        var resultC = document.getElementById('result-container');


        loading.style.display = 'block';
        result.style.display = 'none'; // hide result textarea
        resultC.style.display = 'none';


        var formData = new FormData();
        formData.append('action', 'openai_generate_text');
        formData.append('prompt', prompt);

        fetch('/wp-admin/admin-ajax.php', {
            method: 'POST',
            body: formData
        })
        .then(response => response.json())
        .then(data => {
            loading.style.display = 'none';
            if(data.success) {
                result.value = data.data.choices[0].message.content;
                result.style.display = 'block'; // show result textarea
                resultC.style.display = 'block';
                generateButton.disabled = false;
            } else {
                result.value = 'An error occurred: ' + data.data;
                result.style.display = 'block'; // show result textarea
                resultC.style.display = 'block';
                generateButton.disabled = false;
            }
        })
        .catch(error => {
            loading.style.display = 'none';
            result.value = 'An error occurred: ' + error.message;
            result.style.display = 'block'; // show result textarea
            resultC.style.display = 'block';
            generateButton.disabled = false;

        });
    });

    var copyButton = document.getElementById('copy-button');
    copyButton.addEventListener('click', function() {
        var result = document.getElementById('result');
        result.select();
        document.execCommand('copy');
        alert('Copied to clipboard!');
    });
</script>
5). Developing a YouTube Title Generator In WordPress:
The PHP CODE FOR THE WPCODE SNIPPET:
if (!function_exists('openai_generate_youtube_title')) {
    function openai_generate_youtube_title() {
        // Get the topic from the AJAX request
        $topic = $_POST['prompt'] ?? '';
		$prompt = "Generate a 10 YouTube Title about " . $topic;

        // OpenAI API URL and key
        $api_url = 'https://api.openai.com/v1/engines/davinci-codex/completions';  // Using davinci-codex for creative tasks
        $api_key = 'XX-1-xx';  // Replace with your actual OpenAI API key

        // Headers for the OpenAI API
        $headers = [
            'Content-Type' => 'application/json',
            'Authorization' => 'Bearer ' . $api_key
        ];

        // Body for the OpenAI API
        $body = [
            'prompt' => 'Create a YouTube video title for a video about ' . $topic,
            'max_tokens' => 15  // Limiting the title length
        ];

        // Args for the WordPress HTTP API
        $args = [
            'method' => 'POST',
            'headers' => $headers,
            'body' => json_encode($body),
            'timeout' => 120
        ];

        // Send the request
        $response = wp_remote_request($api_url, $args);

        // Handle the response
        if (is_wp_error($response)) {
            $error_message = $response->get_error_message();
            wp_send_json_error("Something went wrong: $error_message");
        } else {
            $body = wp_remote_retrieve_body($response);
            $data = json_decode($body, true);

            if (json_last_error() !== JSON_ERROR_NONE) {
                wp_send_json_error('Invalid JSON in API response');
            } elseif (!isset($data['choices'][0]['text'])) {
                wp_send_json_error('API request failed. Response: ' . $body);
            } else {
                $title = $data['choices'][0]['text'];
                wp_send_json_success(['title' => $title]);
            }
        }

        // Always die in functions echoing AJAX content
        wp_die();
    }
}

if (!function_exists('ajax_openai_generate_youtube_title')) {
    add_action('wp_ajax_openai_generate_youtube_title', 'openai_generate_youtube_title');
    add_action('wp_ajax_nopriv_openai_generate_youtube_title', 'openai_generate_youtube_title');
}
The HTML, CSS, AND JAVASCRIPT CODE FOR THE WORDPRESS PAGE:
<div id="text-generation-tool">
    <input type="text" id="topic" placeholder="Your Topic...">
    <button id="generate-button">Generate YouTube Title</button>
    <div id="result-container" style="display: none;">
        <div class="result-wrapper">
            <div class="result-content">
                <textarea id="result" readonly></textarea>
            </div>
            <div class="copy-button-container">
                <button id="copy-button">Copy</button>
            </div>
        </div>
    </div>
    <div id="loading" class="loader" style="display: none;"></div>
</div>

<style>
    /* Basic styles for the text generation tool */
    #text-generation-tool {
        width: 100%;
        max-width: 600px;
        margin: 0 auto;
        font-family: Arial, sans-serif;
    }

    #topic {
        width: 100%;
        padding: 15px;
        margin-bottom: 20px;
        font-size: 16px;
        border-radius: 5px;
        border: 1px solid #ddd;
    }

    #generate-button {
        display: block;
        width: 100%;
        padding: 15px;
        margin-bottom: 20px;
        font-size: 16px;
        border: none;
        border-radius: 5px;
        color: #fff;
        background-color: #3498db;
        cursor: pointer;
        transition: background-color 0.3s ease;
    }

    #generate-button:hover {
        background-color: #2980b9;
    }

    #result-container {
        display: none;
        margin-bottom: 20px;
    }

    .result-wrapper {
        position: relative;
        overflow: hidden;
    }

    .result-content {
        display: flex;
    }

    #result {
        flex: 1;
        height: 400px;
        padding: 15px;
        font-size: 16px;
        border-radius: 5px;
        border: 1px solid #ddd;
        background-color: #f9f9f9;
    }

    .copy-button-container {
        margin-top: 10px;
        text-align: right;
    }

    #copy-button {
        padding: 8px 12px;
        font-size: 14px;
        border: none;
        border-radius: 5px;
        color: #fff;
        background-color: #3498db;
        cursor: pointer;
        transition: background-color 0.3s ease;
    }

    #copy-button:hover {
        background-color: #2980b9;
    }

    /* CSS for the loader */
    .loader {
        display: block;
        margin: 50px auto;
        border: 16px solid #f3f3f3; /* Light grey */
        border-top: 16px solid #3498db; /* Blue */
        border-radius: 50%;
        width: 50px;
        height: 50px;
        animation: spin 1s linear infinite;
    }

    @keyframes spin {
        0% { transform: rotate(0deg); }
        100% { transform: rotate(360deg); }
    }
</style>
The JAVASCRIPT CODE:
<script>
    document.getElementById("generate-button").addEventListener("click", function(e){
        e.preventDefault();


        var generateButton = document.getElementById("generate-button");

        if (generateButton.disabled) {
            return; // Prevent multiple clicks while content is being generated
        }

        generateButton.disabled = true;


        var topic = document.getElementById('topic').value;
        var prompt = "Generate a 10 YouTube Title about " + topic;
        var loading = document.getElementById('loading');
        var result = document.getElementById('result');
        var resultC = document.getElementById('result-container');


        loading.style.display = 'block';
        result.style.display = 'none'; // hide result textarea
        resultC.style.display = 'none';


        var formData = new FormData();
        formData.append('action', 'openai_generate_text');
        formData.append('prompt', prompt);

        fetch('/wp-admin/admin-ajax.php', {
            method: 'POST',
            body: formData
        })
        .then(response => response.json())
        .then(data => {
            loading.style.display = 'none';
            if(data.success) {
                result.value = data.data.choices[0].message.content;
                result.style.display = 'block'; // show result textarea
                resultC.style.display = 'block';
                generateButton.disabled = false;
            } else {
                result.value = 'An error occurred: ' + data.data;
                result.style.display = 'block'; // show result textarea
                resultC.style.display = 'block';
                generateButton.disabled = false;
            }
        })
        .catch(error => {
            loading.style.display = 'none';
            result.value = 'An error occurred: ' + error.message;
            result.style.display = 'block'; // show result textarea
            resultC.style.display = 'block';
            generateButton.disabled = false;

        });
    });

    var copyButton = document.getElementById('copy-button');
    copyButton.addEventListener('click', function() {
        var result = document.getElementById('result');
        result.select();
        document.execCommand('copy');
        alert('Copied to clipboard!');
    });
</script>
6). Monetization:
The major purpose of adding AI tools to your website is to burst website traffic. When your traffic grows, you can monetize the website by adding affiliate links at strategic places.
You can create subscription plans for your tool and make money when individuals make use of them. I prefer making my tool-free to drive more traffic.
As your traffic grows tremendously, which will happen, you can equally monetize by placing ads at strategic places.
These are ways you can monetize your AI tools.
NOTE: To grow your popularity, there are website tools handlers you can submit your tools to get more traffic and they are:
i). Futuretools
ii). Futuerpedia
You can equally share your newly created tools on social media like Twitter(X), LinkedIn, and Facebook to drive more traffic. Then let’s conclude.
7). Conclusion:
a). Recap Of Key Steps And Considerations On AI Generation Tools:
When using AI generation tools, there are several key steps and considerations to keep in mind to ensure effective and responsible use. Here’s a recap:
Key Steps:
i). Define Objectives: Clearly define what you want to achieve with the AI-generated content. Whether it’s creating text, images, or other types of content, having a clear objective will guide the process.
ii). Select the Right Tool: There are various AI generation tools available for different tasks. Choose a tool that aligns with your objectives and requirements.
iii). Data Input: Ensure that the input data provided to the AI tool is relevant, accurate, and of high quality. The quality of the output often depends on the quality of the input.
iv). Customization: Many AI tools allow customization to better suit your needs. Take advantage of features that allow you to customize the output to make it more relevant and tailored.
v). Review and Refinement: Always review the AI-generated content for accuracy, relevance, and quality. Make necessary adjustments or refinements to improve the output.
vi). Ethical Considerations: Be aware of the ethical implications of using AI-generated content, especially when it comes to plagiarism, copyright issues, and potential biases.
vii). Feedback Loop: Establish a feedback loop where you can continuously improve the AI-generated content based on feedback from users or stakeholders.
Key Considerations:
i). Quality Assurance: Ensure that the AI-generated content meets the desired quality standards. It should be accurate, coherent, and relevant to the intended audience.
ii). Transparency: Understand how the AI tool works and be transparent about using AI-generated content. This includes acknowledging when content is AI-generated and not human-created.
iii). Bias and Fairness: AI models can sometimes inherit biases from the data they are trained on. Be aware of this and take steps to mitigate bias to ensure fairness in the AI-generated content.
iv). Legal and Compliance: Ensure that the AI-generated content complies with legal regulations, especially when it comes to data privacy, copyright, and intellectual property rights.
v). User Experience: Consider the user experience when deploying AI-generated content. Ensure that it aligns with user expectations and enhances the overall experience rather than detracting from it.
vi). Cost and Scalability: Evaluate the cost of using AI generation tools and consider scalability options, especially if you plan to generate a large volume of content.
vii). Human Oversight: Even with AI-generated content, human oversight is essential. Humans can provide context, creativity, and judgment that AI may lack.
By following these key steps and considerations, you can effectively and responsibly use AI generation tools to create content that meets your objectives while ensuring quality, ethical considerations, and compliance with regulations.
b). Future Trends in AI and WordPress Integration:
The integration of AI with WordPress is an exciting area that is expected to see significant growth and innovation in the coming years. Here are some future trends to watch for in AI and WordPress integration:
- Chatbots and Virtual Assistants
— Description: Advanced chatbots and virtual assistants powered by AI will become more prevalent on WordPress websites.
— Benefits: They can provide instant customer support, answer queries, and guide users through the website, enhancing user experience and engagement.
- Content Generation and Personalization
— Description: AI tools will be used to generate and personalize content based on user preferences, behavior, and demographics.
— Benefits: This will help in delivering more relevant content to users, improving engagement, and increasing conversions.
- SEO Optimization
— Description: AI-powered SEO tools will help website owners optimize their content for search engines more effectively.
— Benefits: These tools can analyze keywords, suggest optimizations, and track SEO performance, helping websites rank higher in search engine results.
- E-commerce Enhancements:
— Description: AI can enhance e-commerce capabilities by providing personalized product recommendations, optimizing pricing strategies, and improving customer service.
— Benefits: This can lead to increased sales, improved customer satisfaction, and enhanced user experience for e-commerce websites built on WordPress.
- Visual Recognition and Media Management:
— Description: AI-powered visual recognition tools can help in automatically tagging and categorizing images and videos uploaded to WordPress sites.
— Benefits: This can streamline media management, improve accessibility, and enhance the overall content organization on websites.
- Security Enhancements:
— Description: AI-driven security solutions can help in identifying and mitigating security threats in real time.
— Benefits: This can enhance website security, protect against malware and hacking attempts, and ensure the safety of user data.
- Voice Search Optimization:
— Description: With the rise of voice-activated devices and voice search, AI can help in optimizing websites for voice search queries.
— Benefits: This can improve website visibility and accessibility for users who prefer voice search, leading to increased traffic and engagement.
- Integration with IoT Devices:
— Description: AI can facilitate the integration of WordPress websites with Internet of Things (IoT) devices, enabling smart functionalities.
— Benefits: This can open up new opportunities for interaction and automation, enhancing user experience and offering innovative solutions for businesses.
- Automated Testing and Maintenance:
— Description: AI-powered tools can automate testing and maintenance tasks, ensuring that WordPress websites are running smoothly and efficiently.
— Benefits: This can reduce manual efforts, minimize downtime, and improve the overall performance and reliability of WordPress websites.
- Cross-platform Integration:
— Description: AI can enable seamless integration of WordPress with other platforms and services, such as social media, email marketing, and CRM systems.
— Benefits: This can enhance marketing efforts, improve data synchronization, and provide a unified experience across different platforms and channels.
In conclusion, the integration of AI with WordPress is set to revolutionize the way websites are built, managed, and optimized.
By embracing these future trends, WordPress users can leverage the power of AI to enhance user experience, improve efficiency, and drive business growth.
It’s an exciting time for AI and WordPress integration, and the possibilities are endless!